

API Data Fetching with React
How to use fetch with async/await to get data on the Frontend (in React)


Table of contents
- Some Prerequisites
- Where to begin?
- Taking out the trash
- Let's dive right in
- Finding some data to use...
- Conjunction Function
- Async full of variables
- Await off of your shoulders
- No, not 'Jason'...JSON
- Don't forget the Map on your journey
- The useState of the Union
- For good useEffect, use this...
- Last Person in is a rotten variable!
- Success! Great job Coder
I decided instead of making a long blog article about data and APIs and the what/how/why of it all (which I’m currently writing in another article coming soon), I’ve decided to write a simple article on how to retrieve data on the Frontend side using React.
(Definitely look forward to that big article on API and Data here soon!)
Some Prerequisites
A few good things to have installed and ready to go on your computer to get started:
A little React knowledge
Some JavaScript knowledge
A Text Editor (rec. Visual Studio Code)
Node.js (Nodejs.org)
Git (optional) (Git)
A Web Browser (rec. Firefox)
Your OS of choice doesn't really matter. Myself, I use a 2022 MacBook Air, but if you use a Windows environment that's alright as well. No haters here, all coders are different! (:
Where to begin?
Let’s start by creating a React app using my preferred method: [create-react-app].
I realize some people prefer using Vite to get their FE apps up and running, which is absolutely a good way to use it as well. However, call me old school, but I find the best route to setting up a React application from scratch is by using the React recommended method of CRA.
First, we'll crack open the Terminal (or Command Prompt on Windows), and create a new app somewhere that you won't lose it (I prefer my Desktop, but it's up to you where you navigate on your local). Once you're in the directory you want to put your new app into, we are going to enter the following:
npx create-react-app <enter-react-app-name-here>
For my app, I chose the simple name react-fetching-app, but you can call it whatever you would like. Hell, you could call it banana-monkey if you'd like. The only rules are no spaces in the name, and no capitalizations (not sure why on the last one, but it is what it is). But, dashes are recommended for more than one-word app names.

Once that has been completed, you should see these 2 next steps populate like so on your terminal:

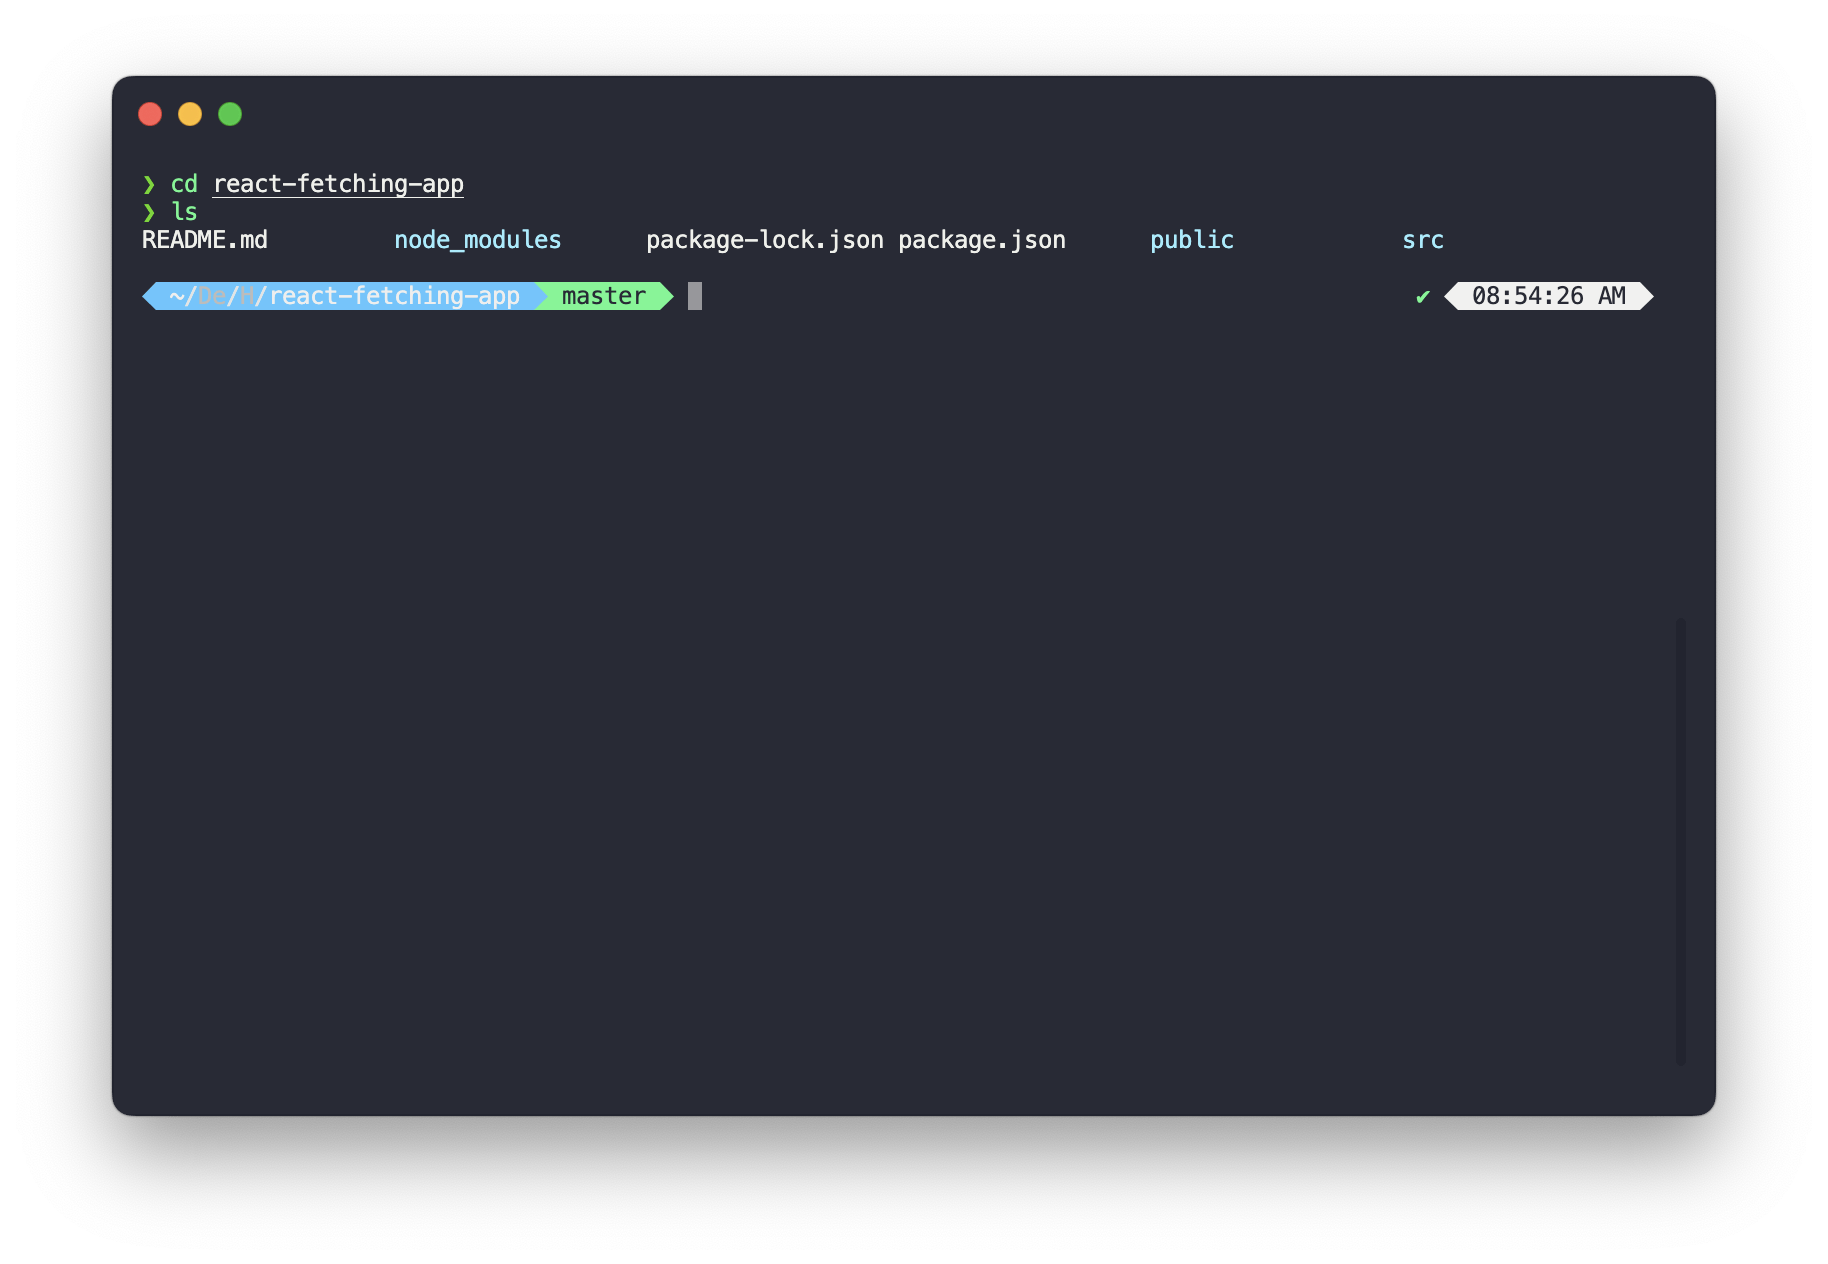
So now we will do exactly what is suggested to do! We will cd ('change directory' in terminal lingo) into the newly created react-fetching-app application, and we can get it up and running right from the jump. After you cd into the app, if you press ls (that's a lowercase 'L' by the way, followed by an 's') - or dir if you're on a Windows system - it should display all of the main files/folders that have been created by the CRA package.
Simply enter npm start and you should in just a moment see a new browser window open up with something that looks like this:
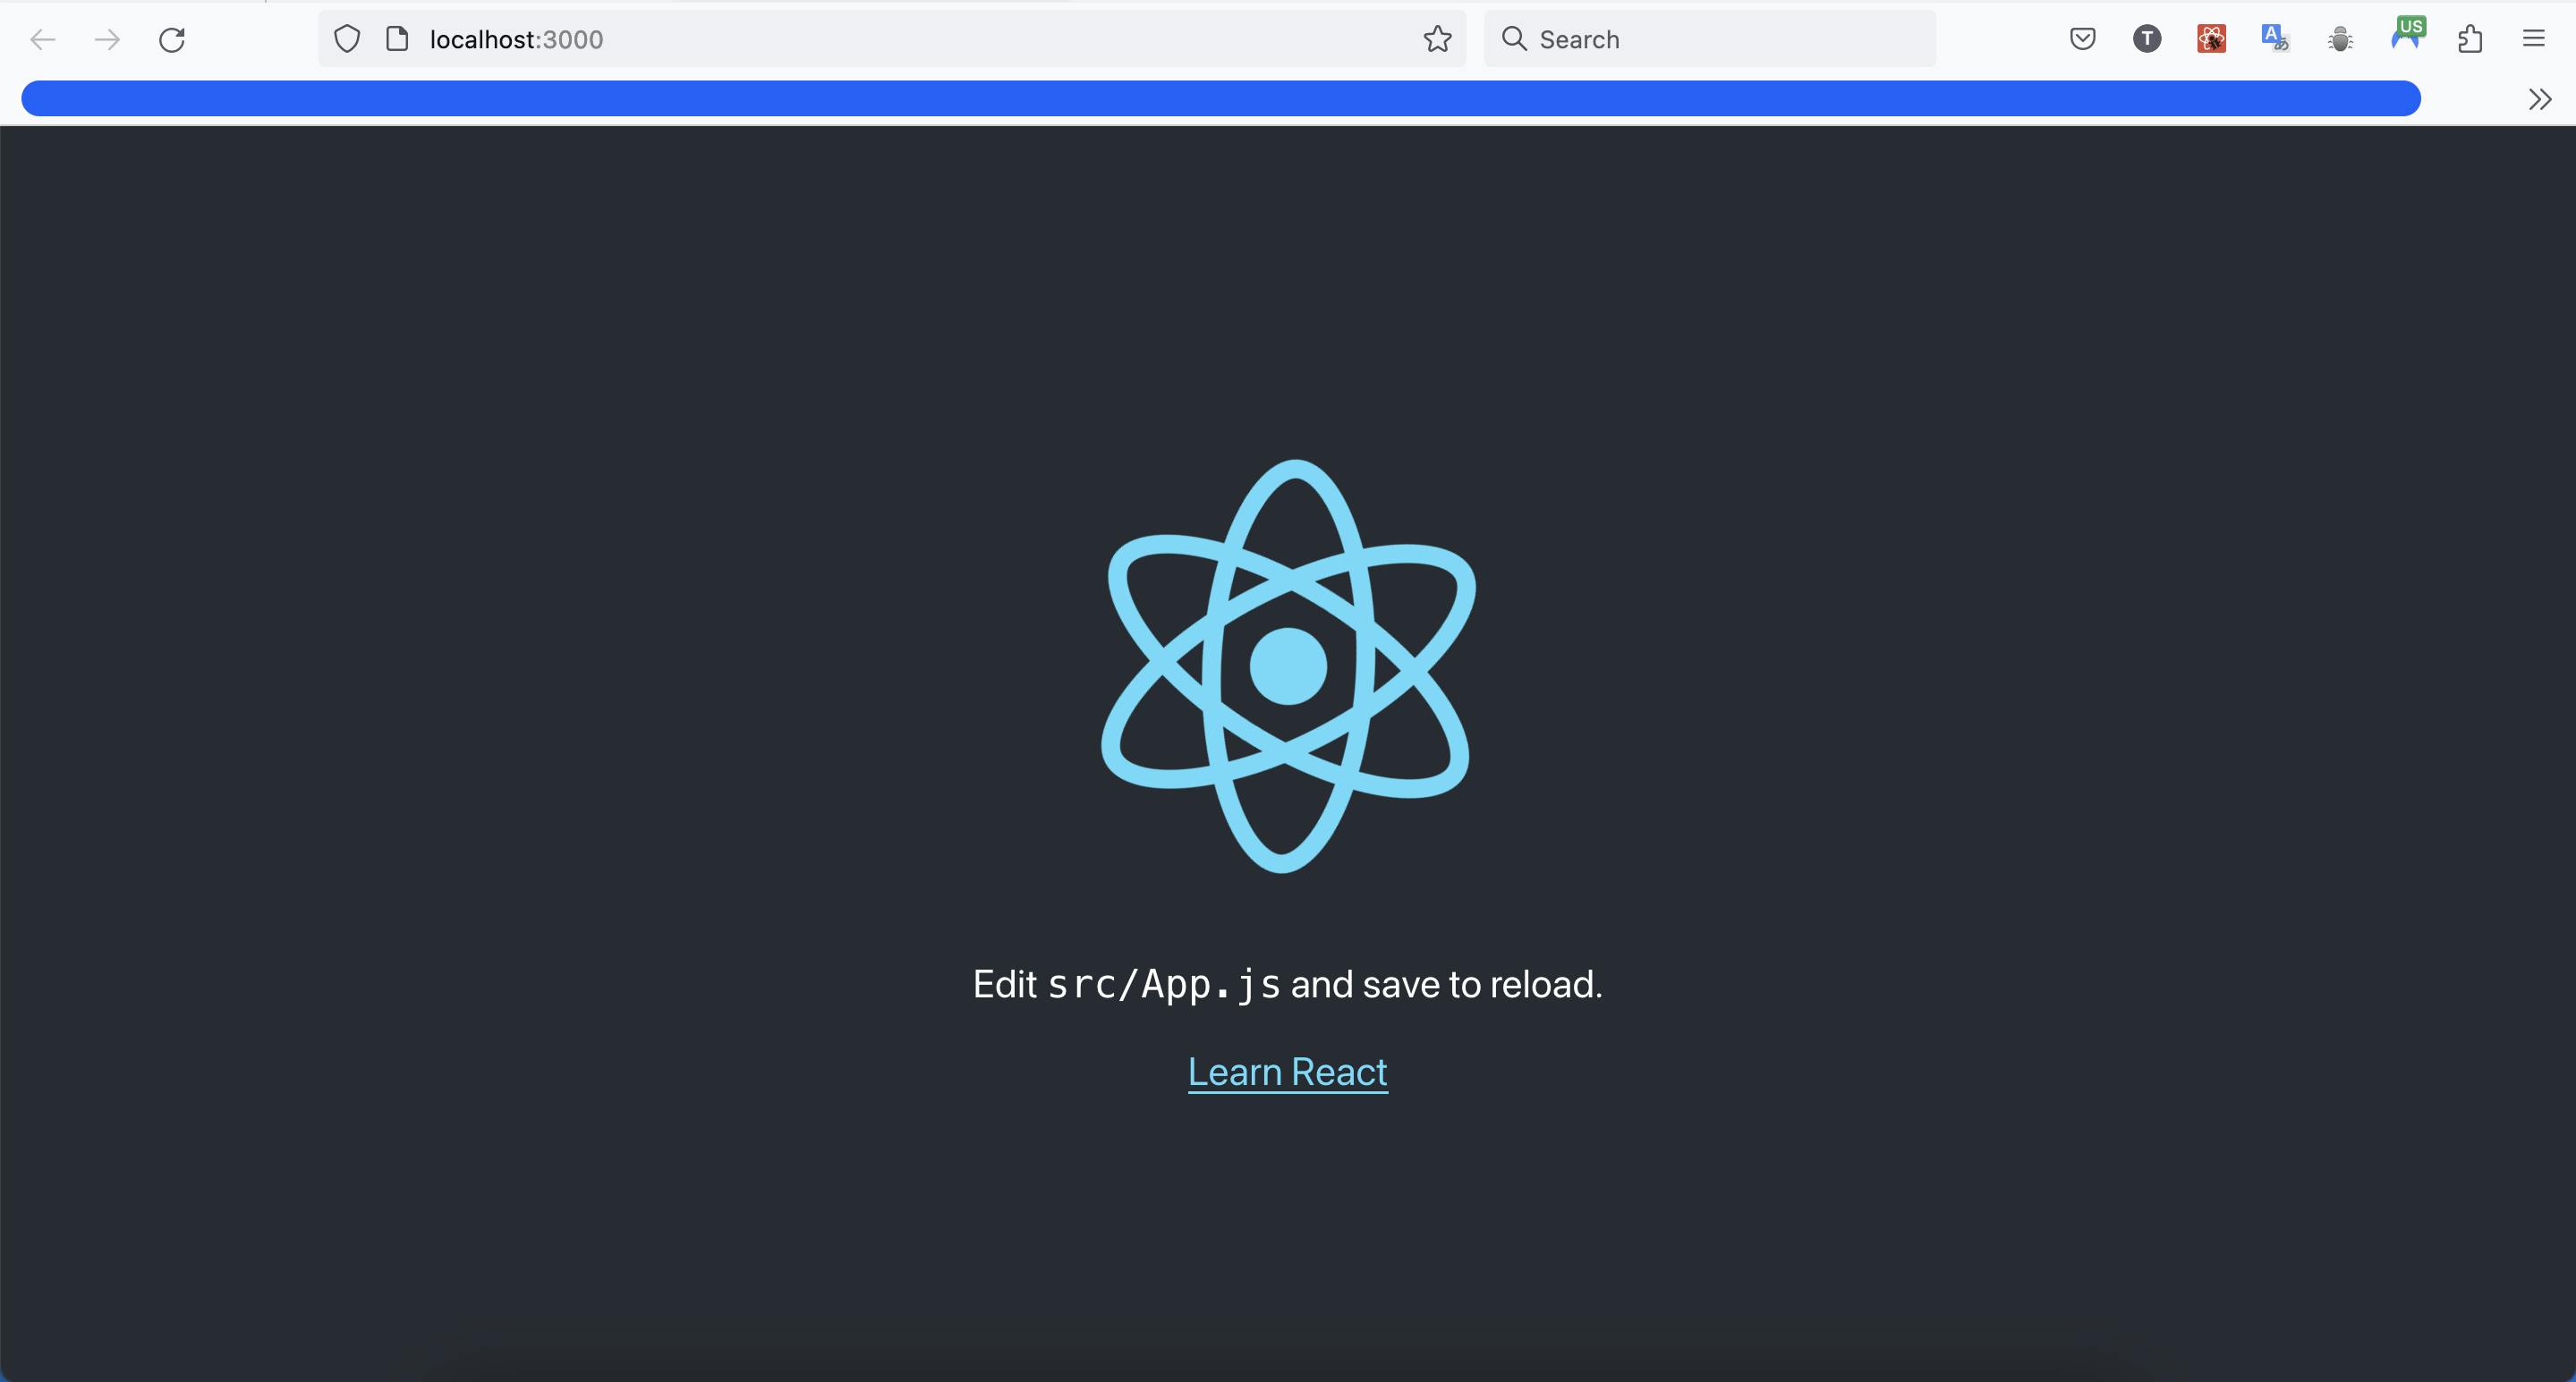
Now, we can get into the fun stuff of setting up our application. 😎
Taking out the trash
To start, let's go ahead and open up our Text Editor of choice (again, my ride or die is VS Code), and take a look at how to get to fetching data with React.
Methods for opening the code:
Drag the folder to the text editor icon
Open the text editor and select Open Folder
In Terminal, enter: code . (if you have VS Code setup to your PATH)

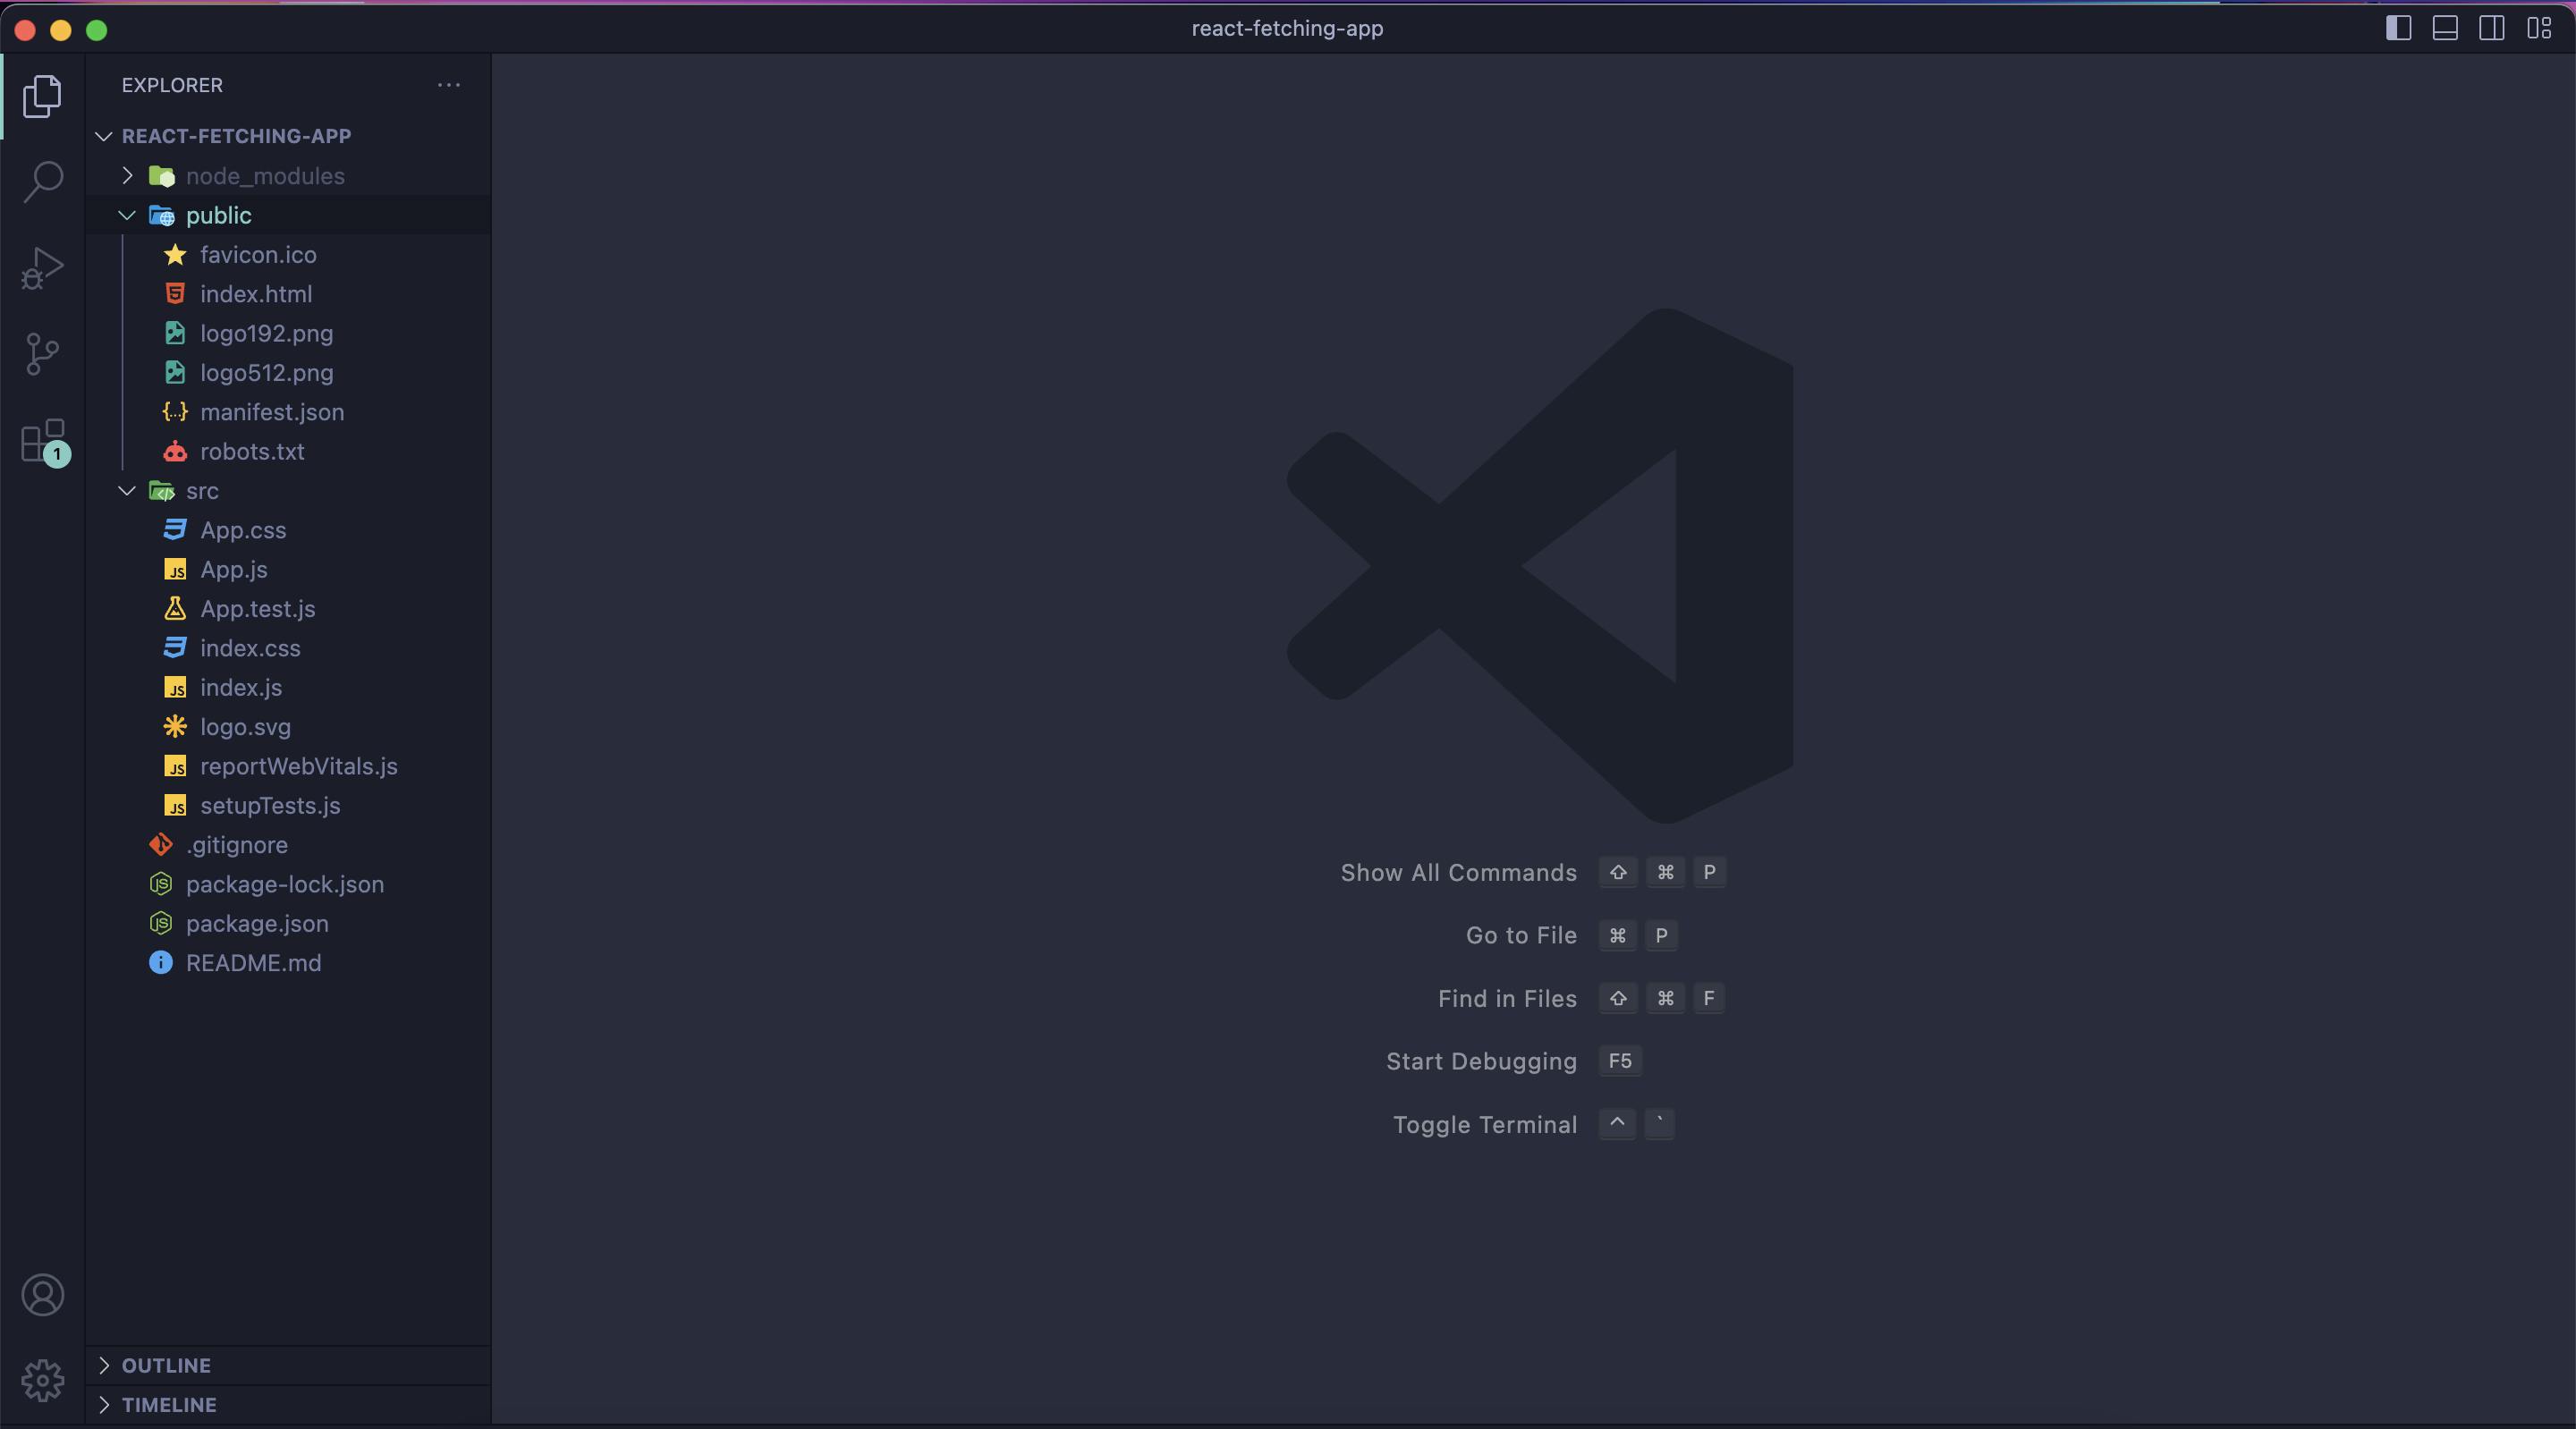
Upon opening the editor, you should see the directory structure look something like this:
I am going to make a few cosmetic alterations, which I recommend doing, and this will help make coding a bit simpler for the project.
Before 👆🏼
After👇🏼

This simplifies everything we need for this very straightforward app. No flare, no bs. Just code.
Let's dive right in
Starting with index.js. This is where the app comes into play through the usage of latching onto an HTML element (a div in most build cases) with an id of root. But let's get rid of the fluff in the script file.
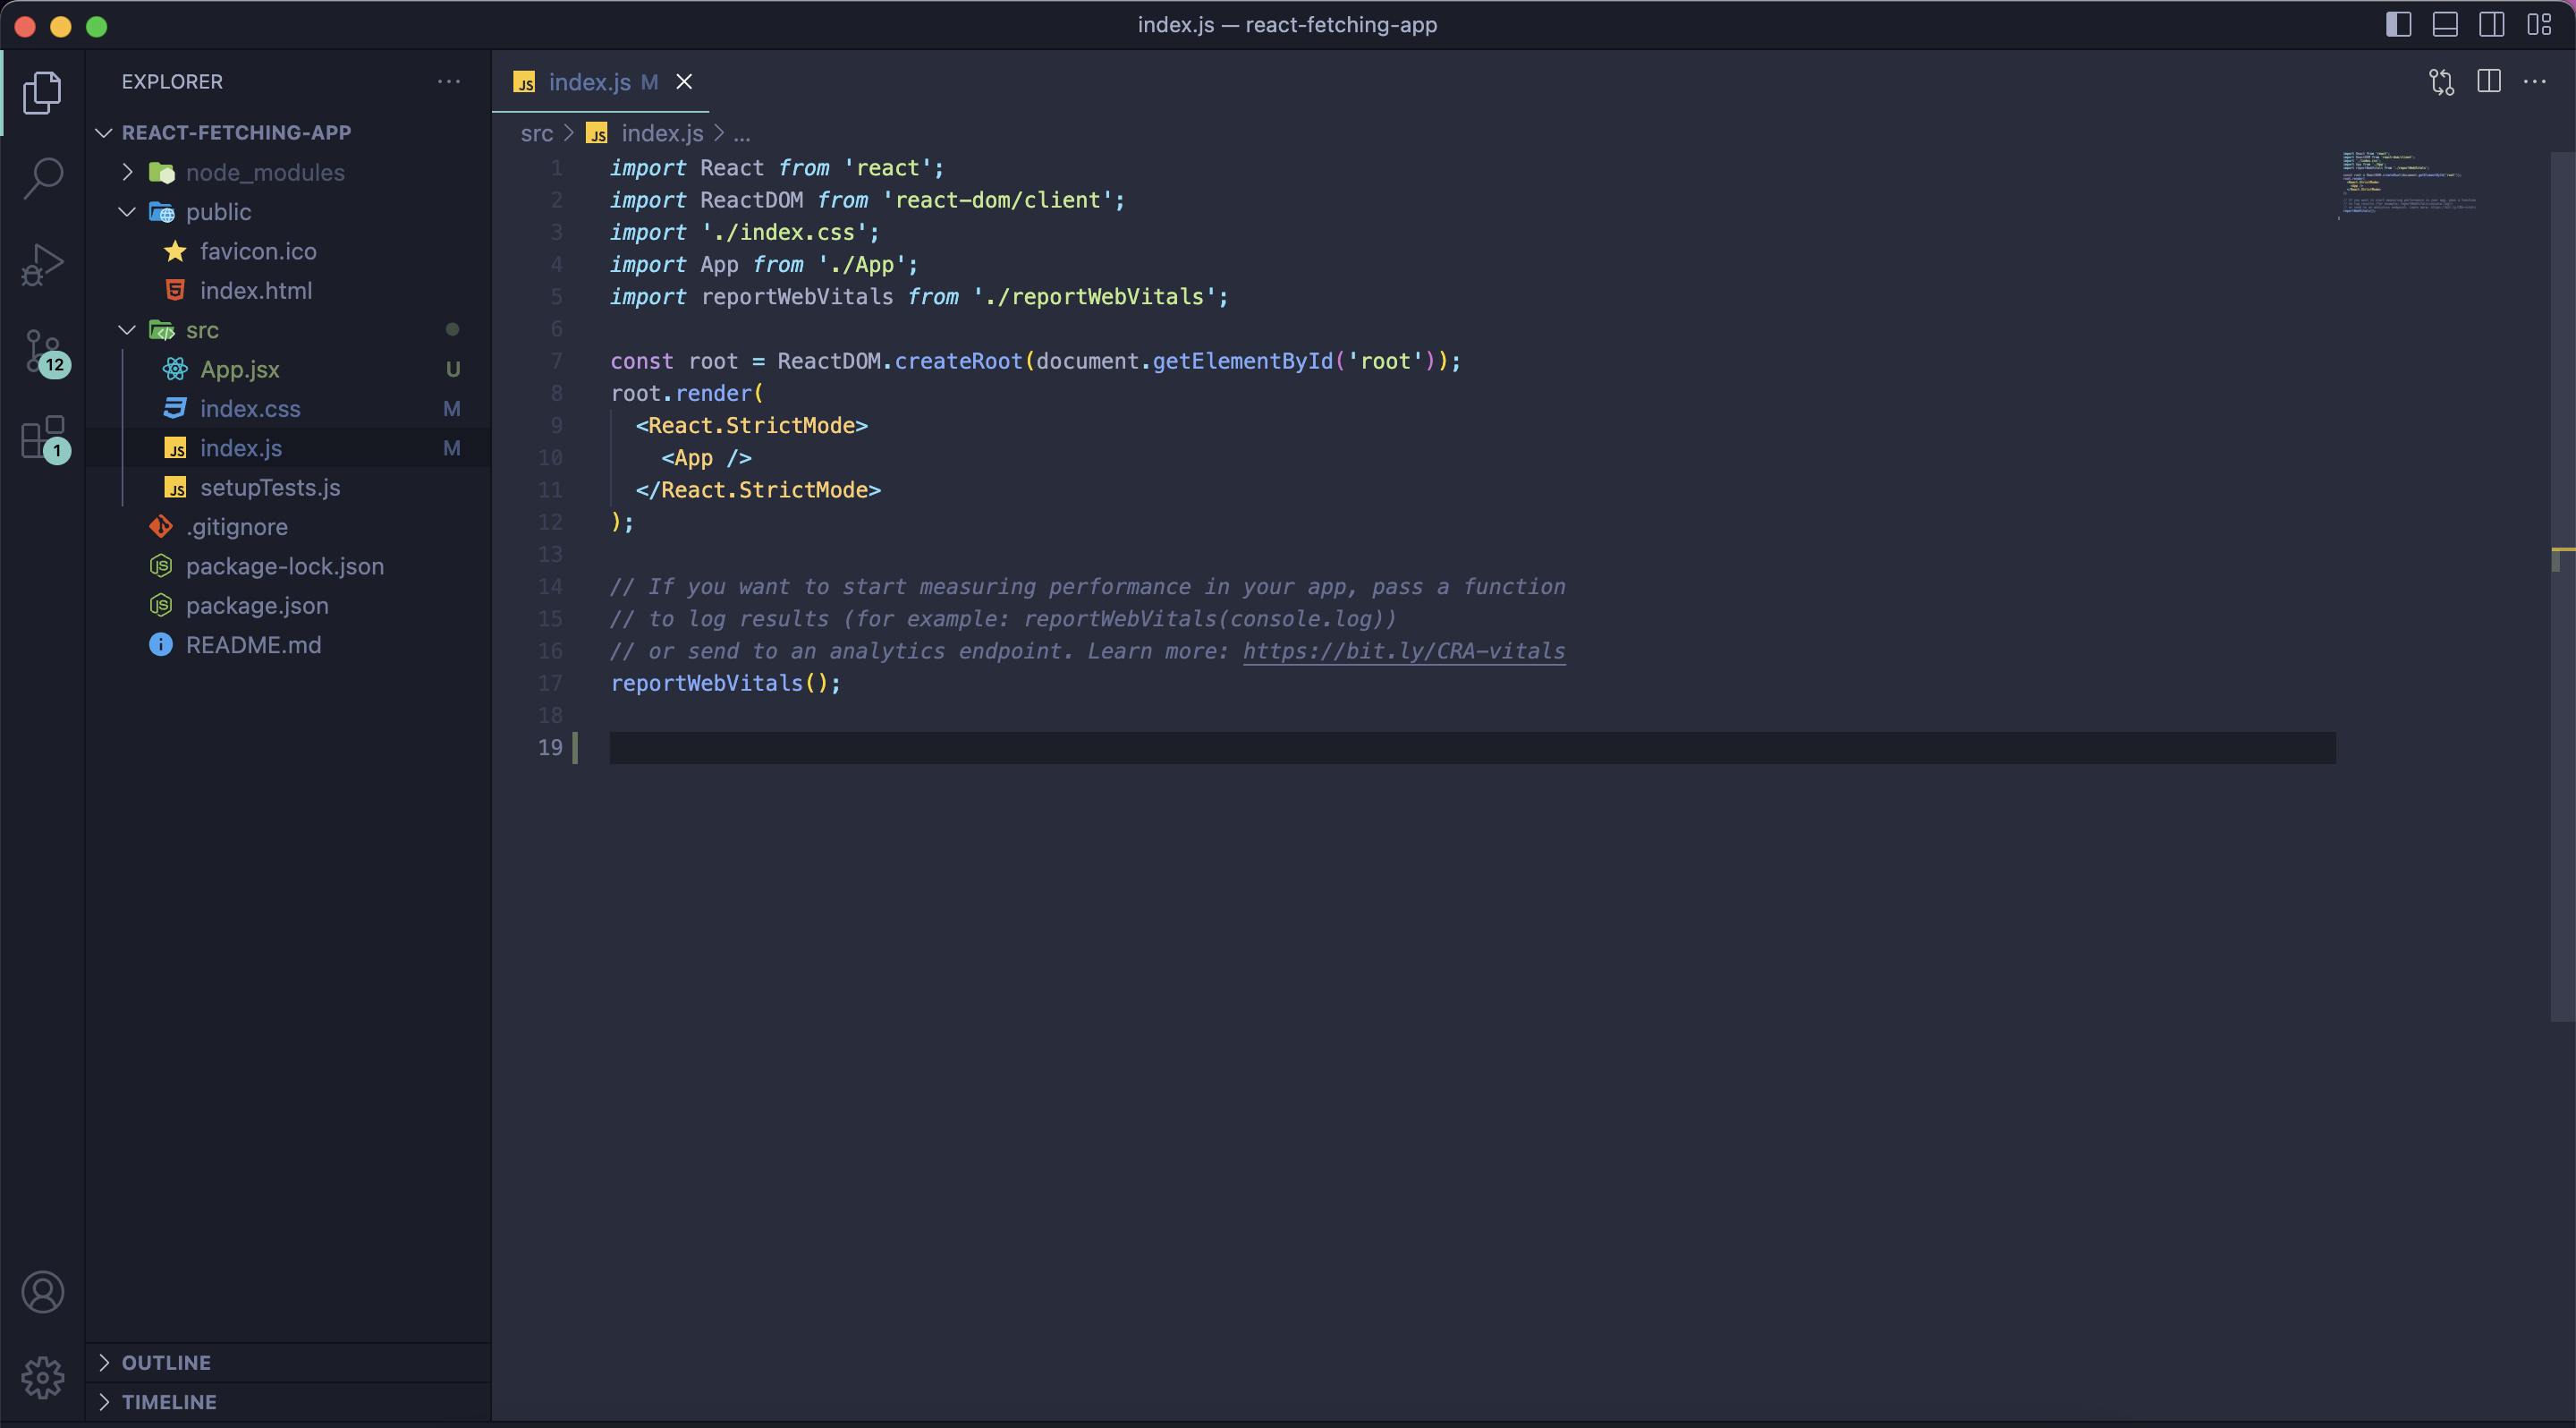
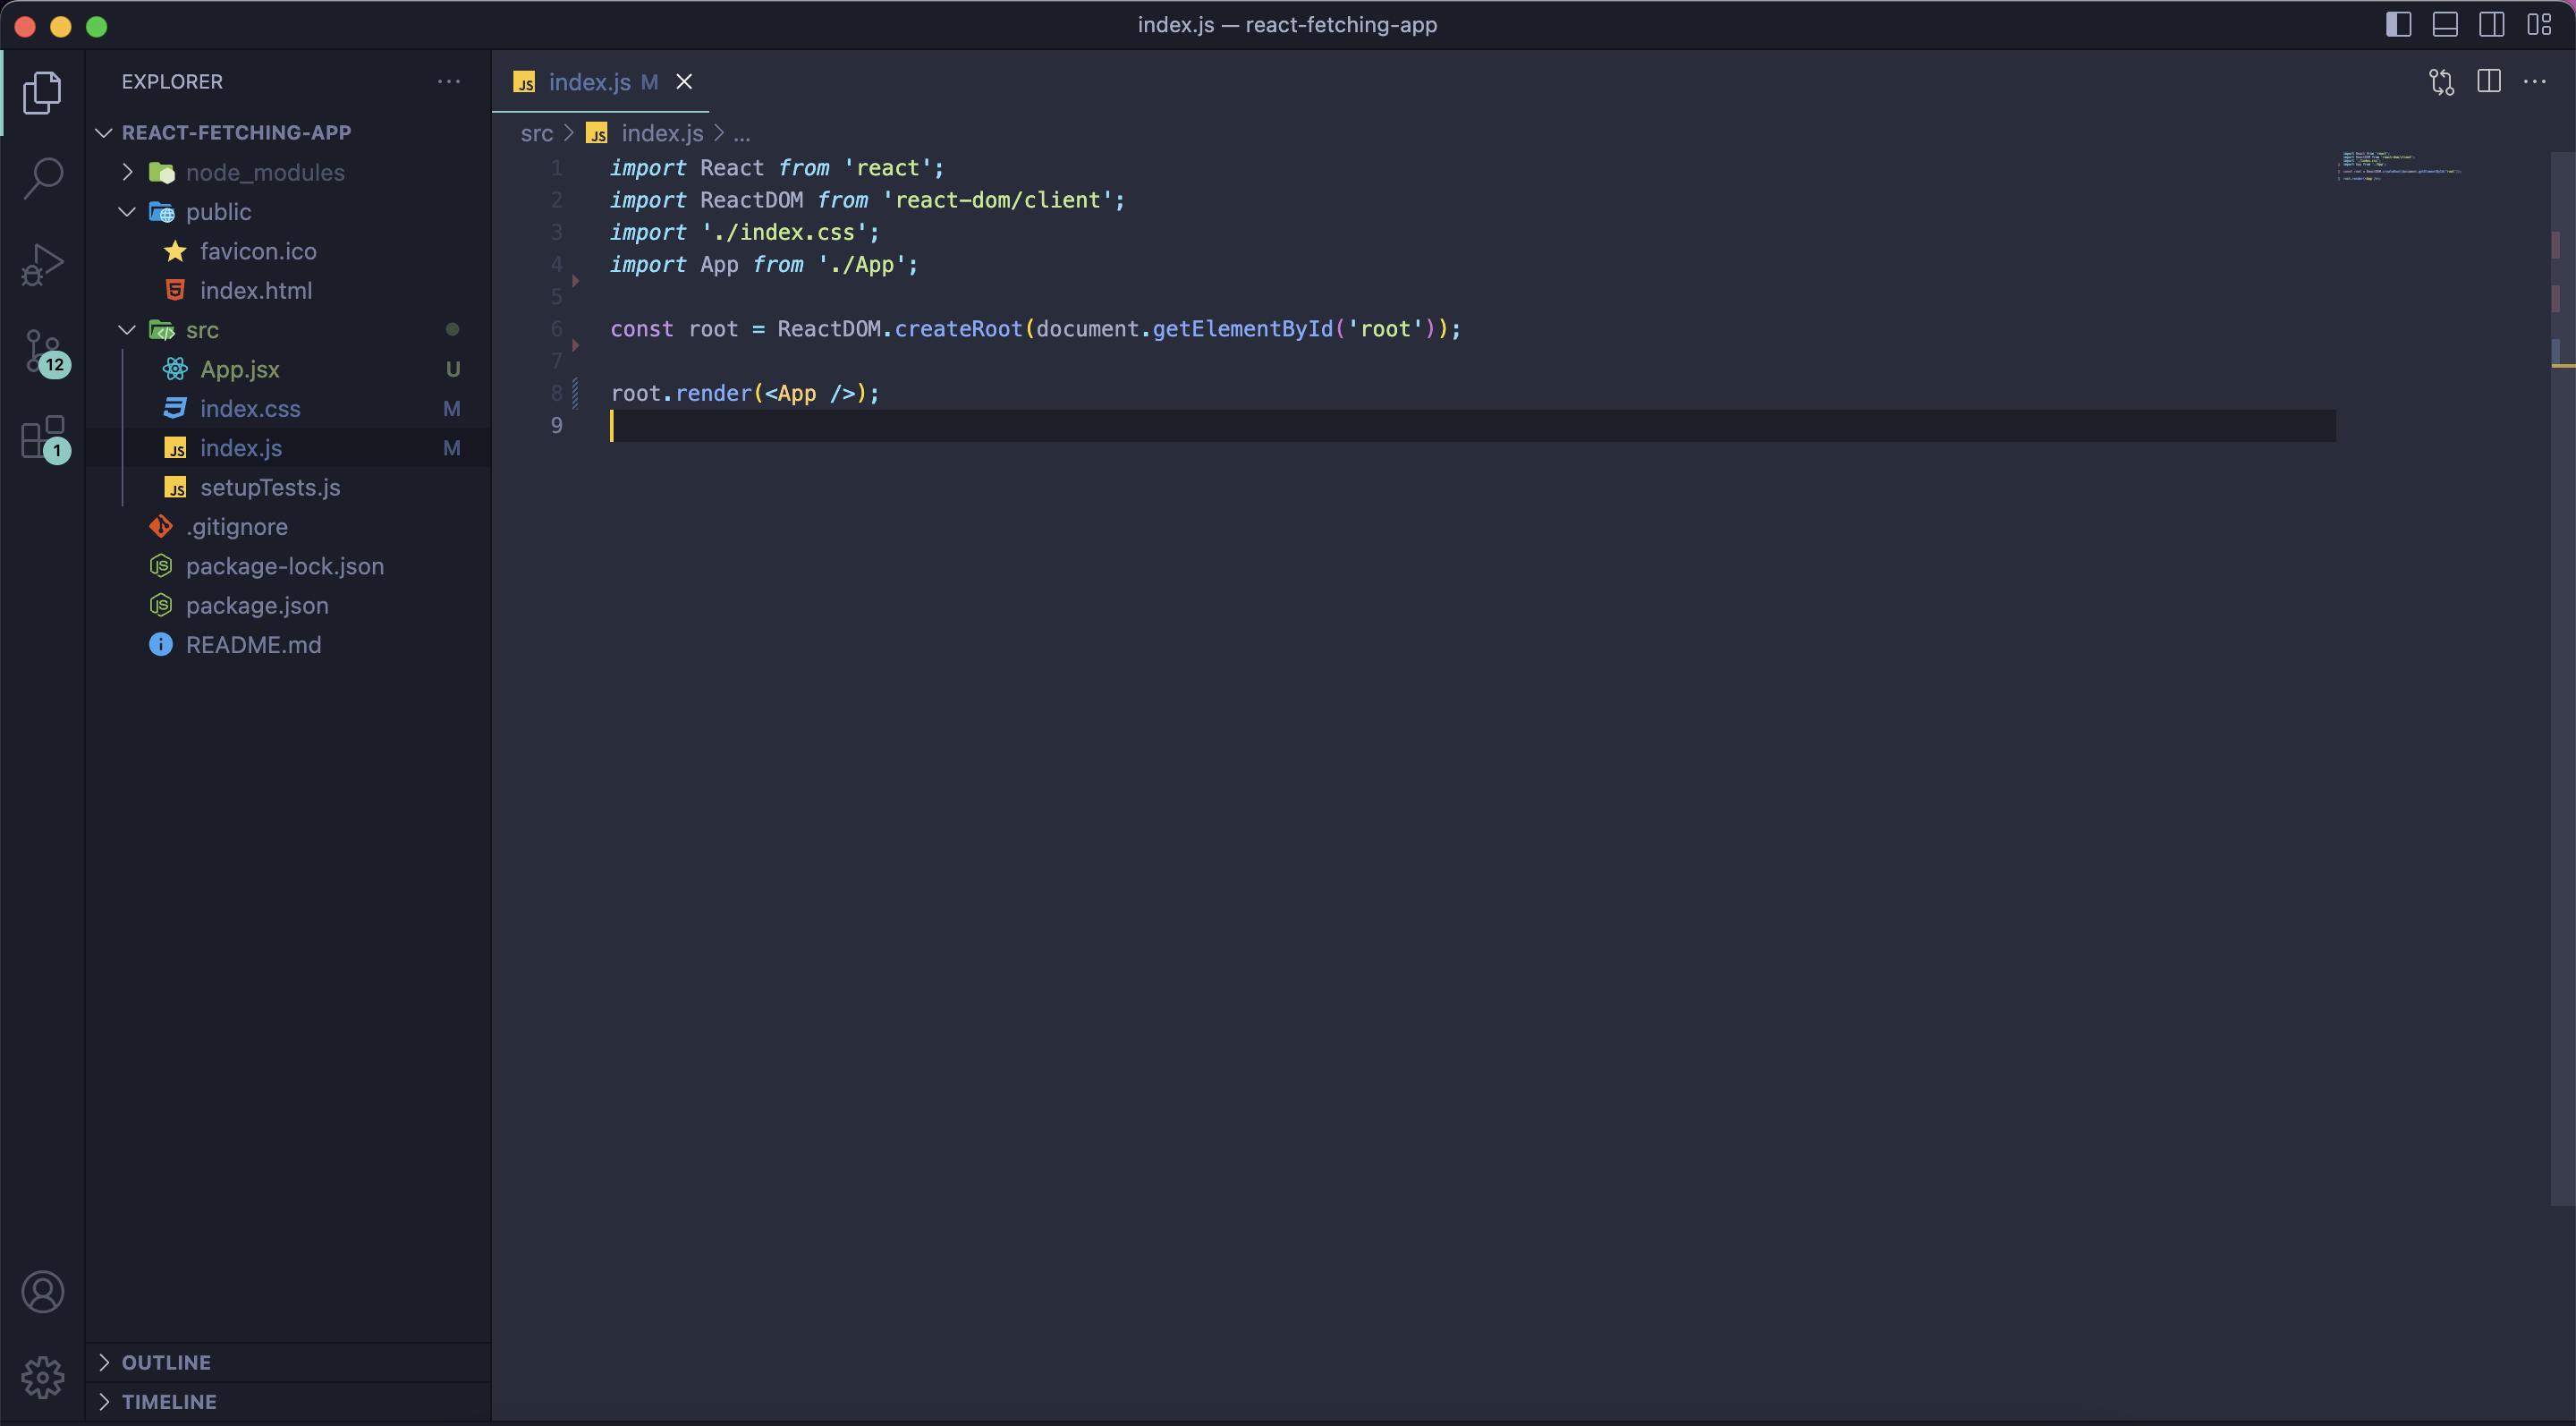
We can get rid of all the unnecessary lines of code, to make it only have simply what we need to run properly. Again, no filler.
We will add some CSS just to make things look a bit less plain jane so to speak.
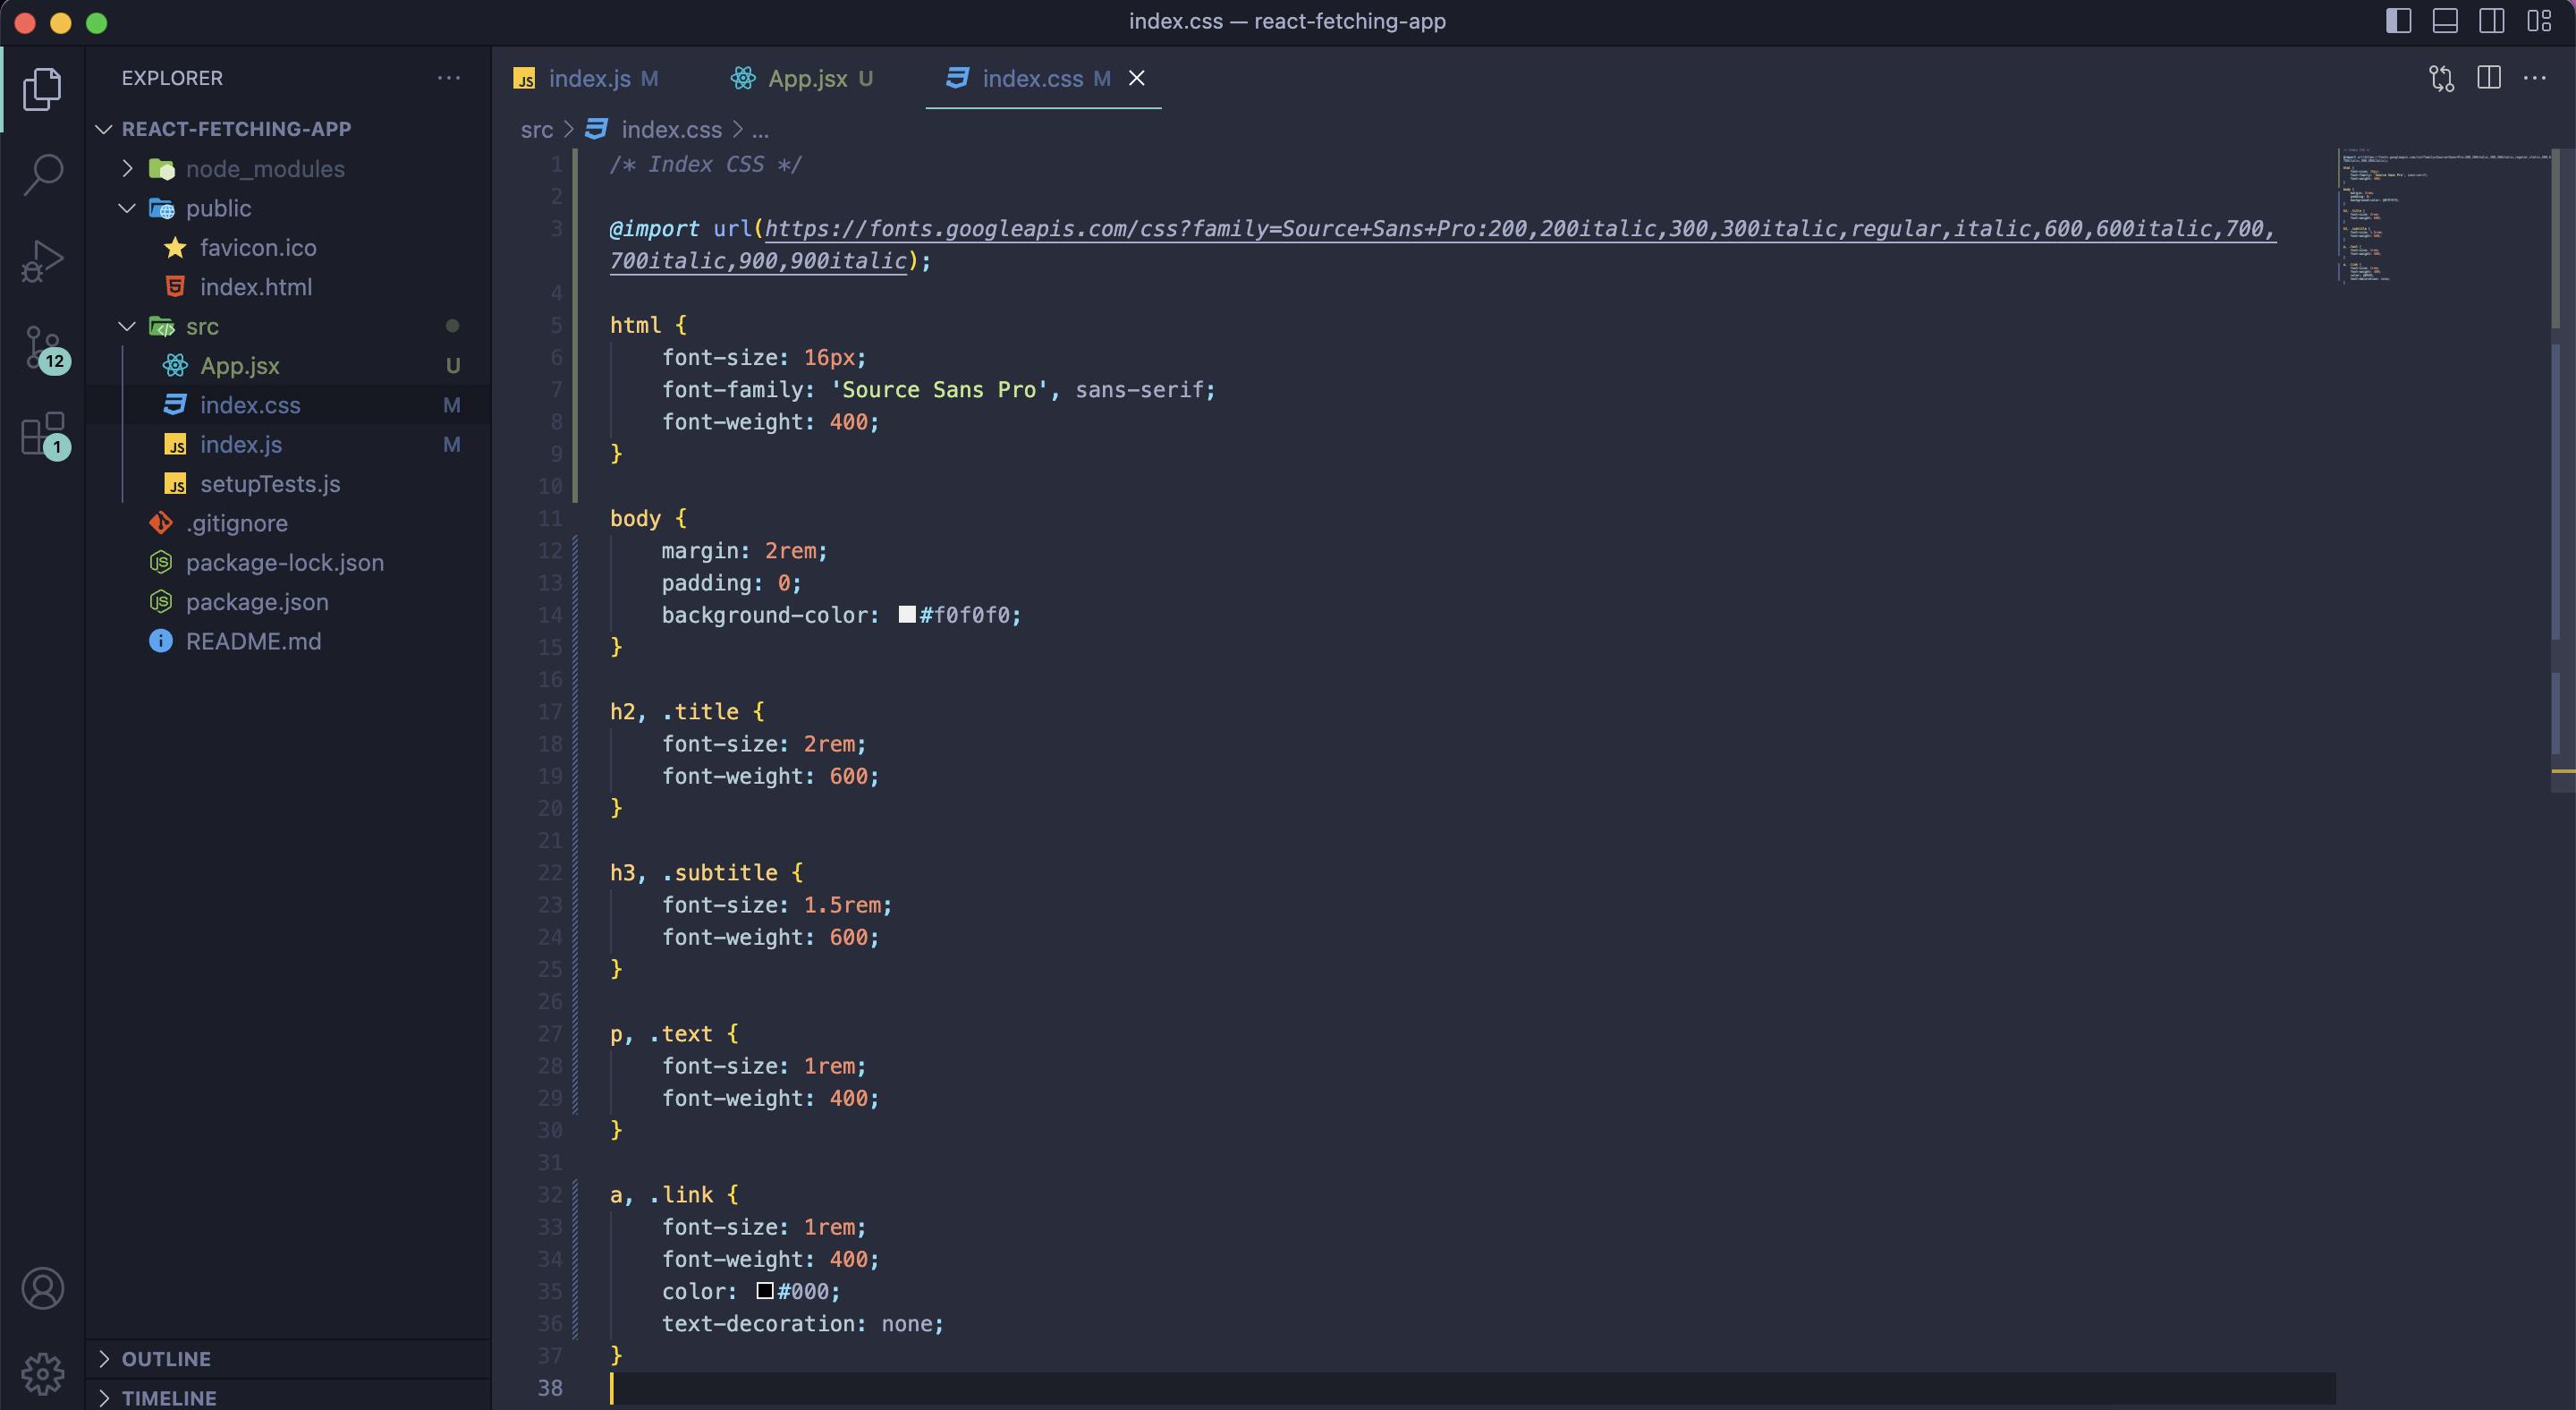
I imported the font 'Source Sans Pro' from Google Fonts
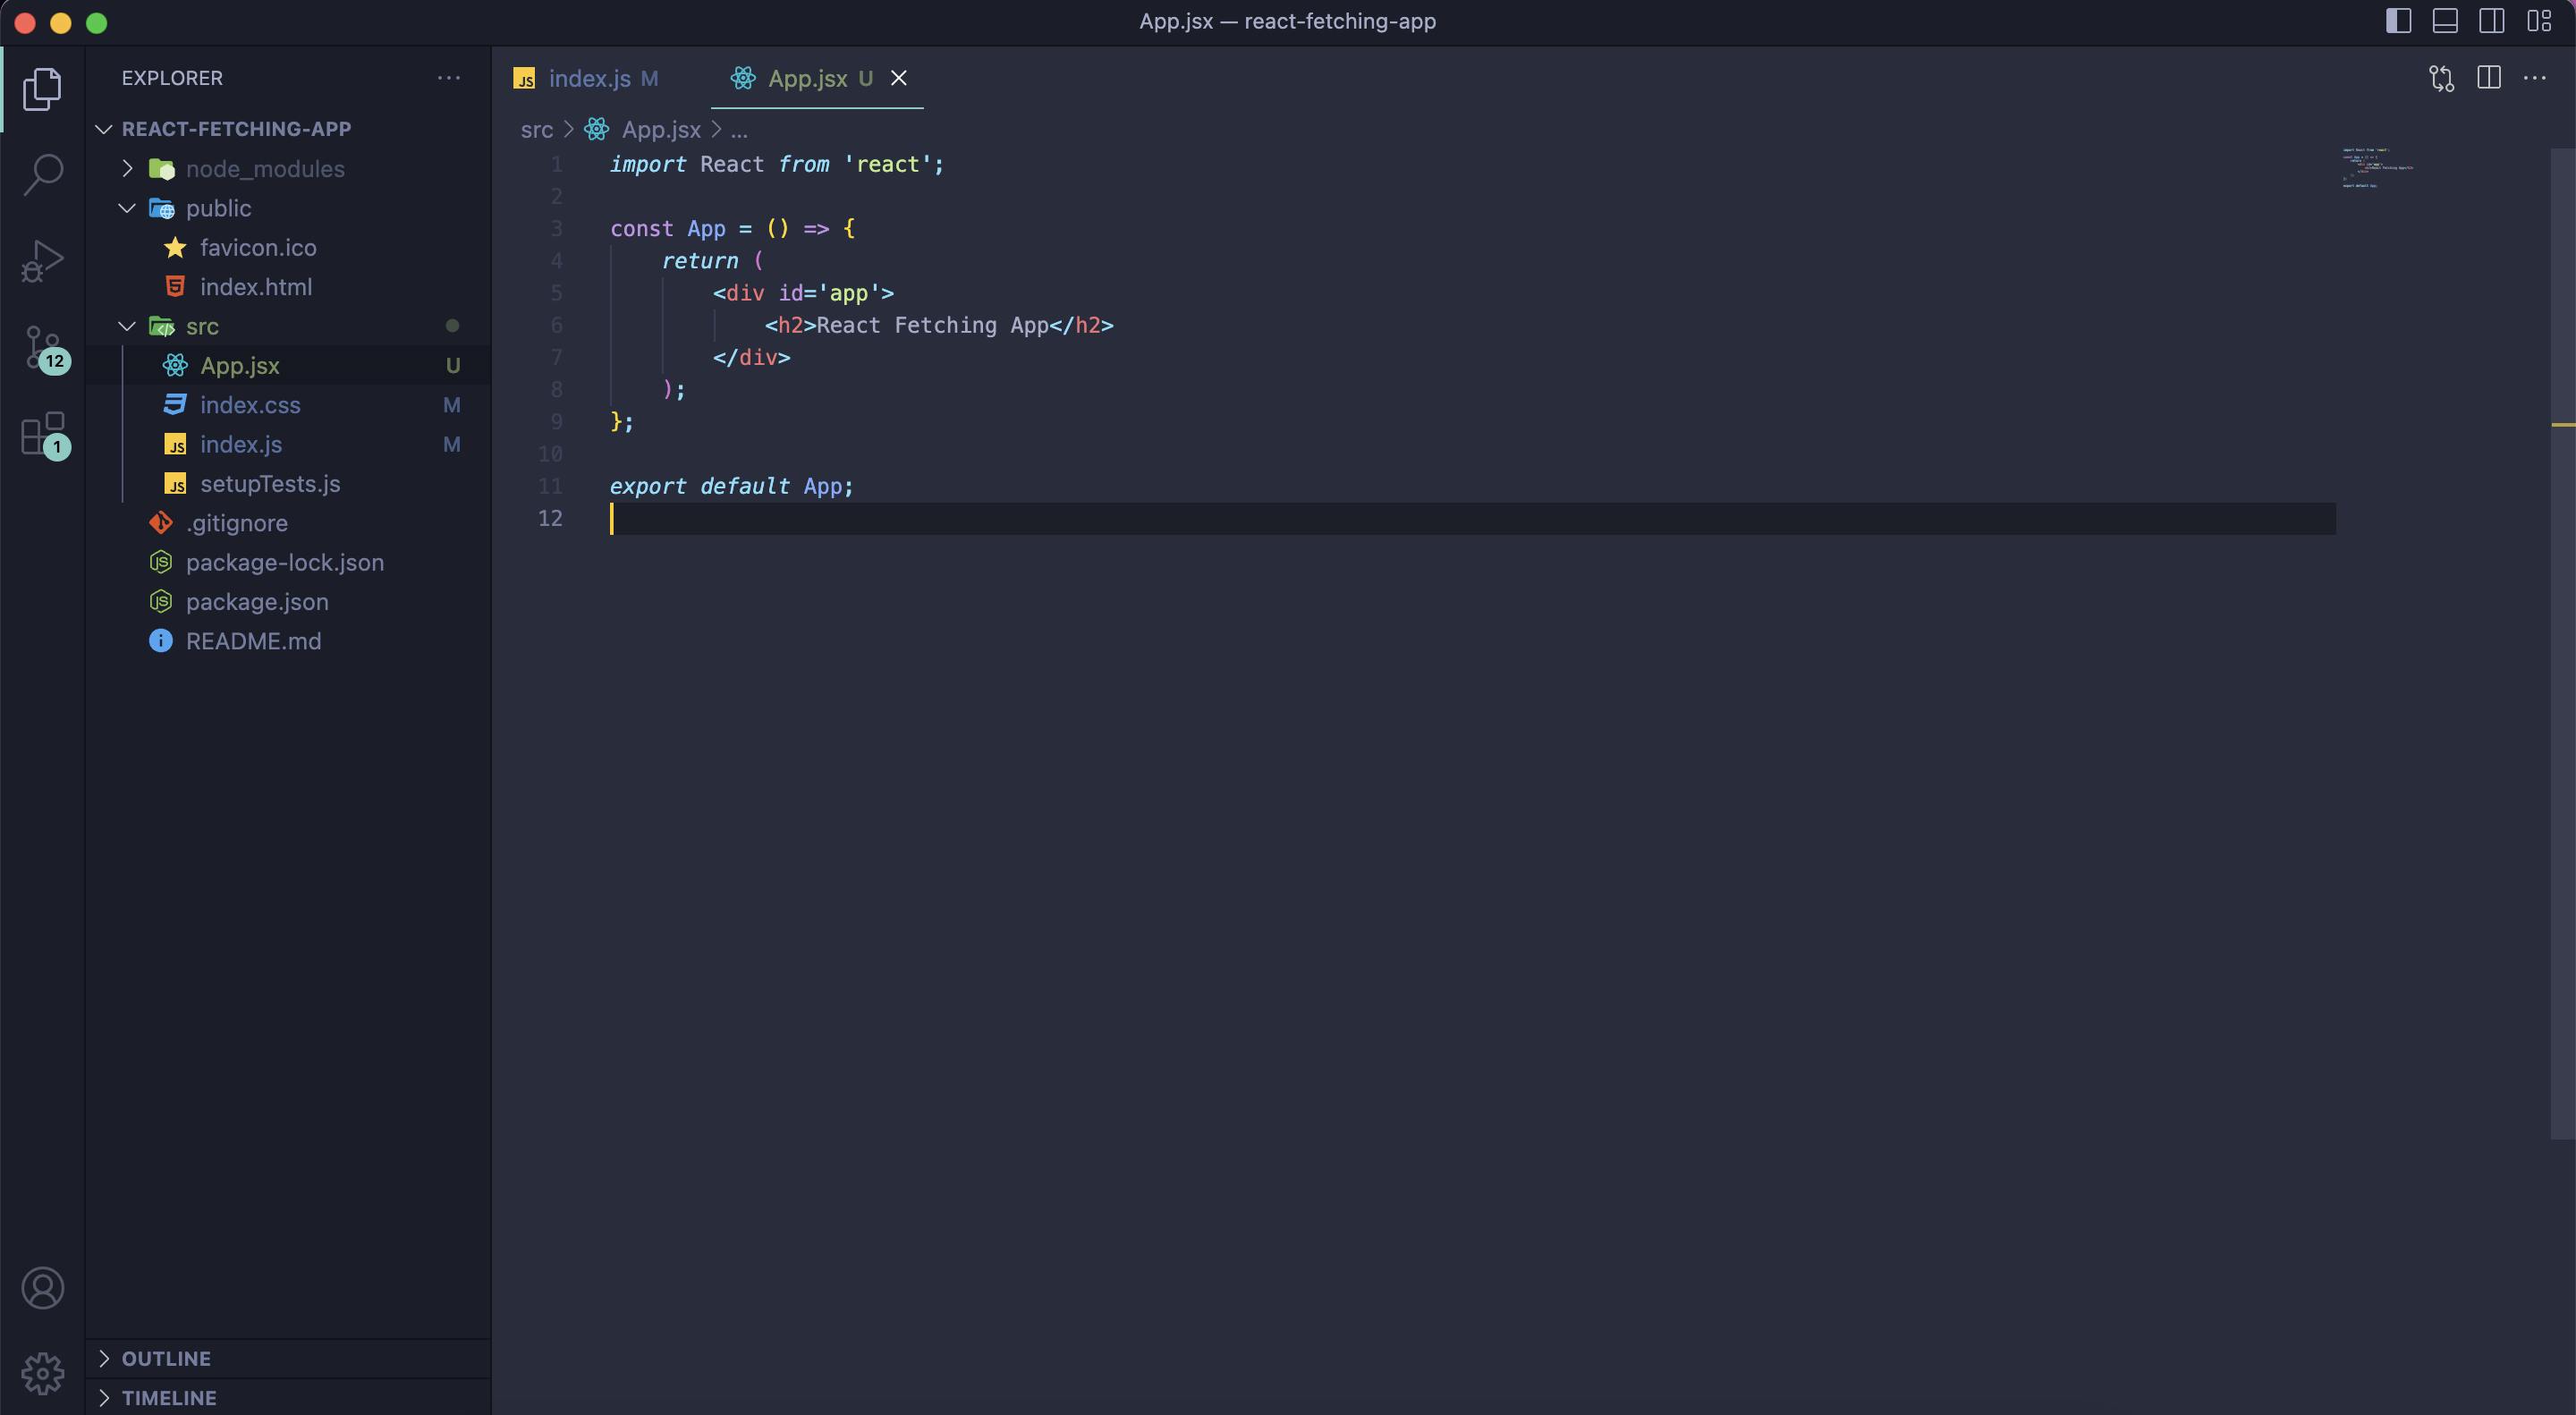
Let's move on to the entire point of this article in the first place: Setting up the App.jsx file, and fetching some data.
Finding some data to use...
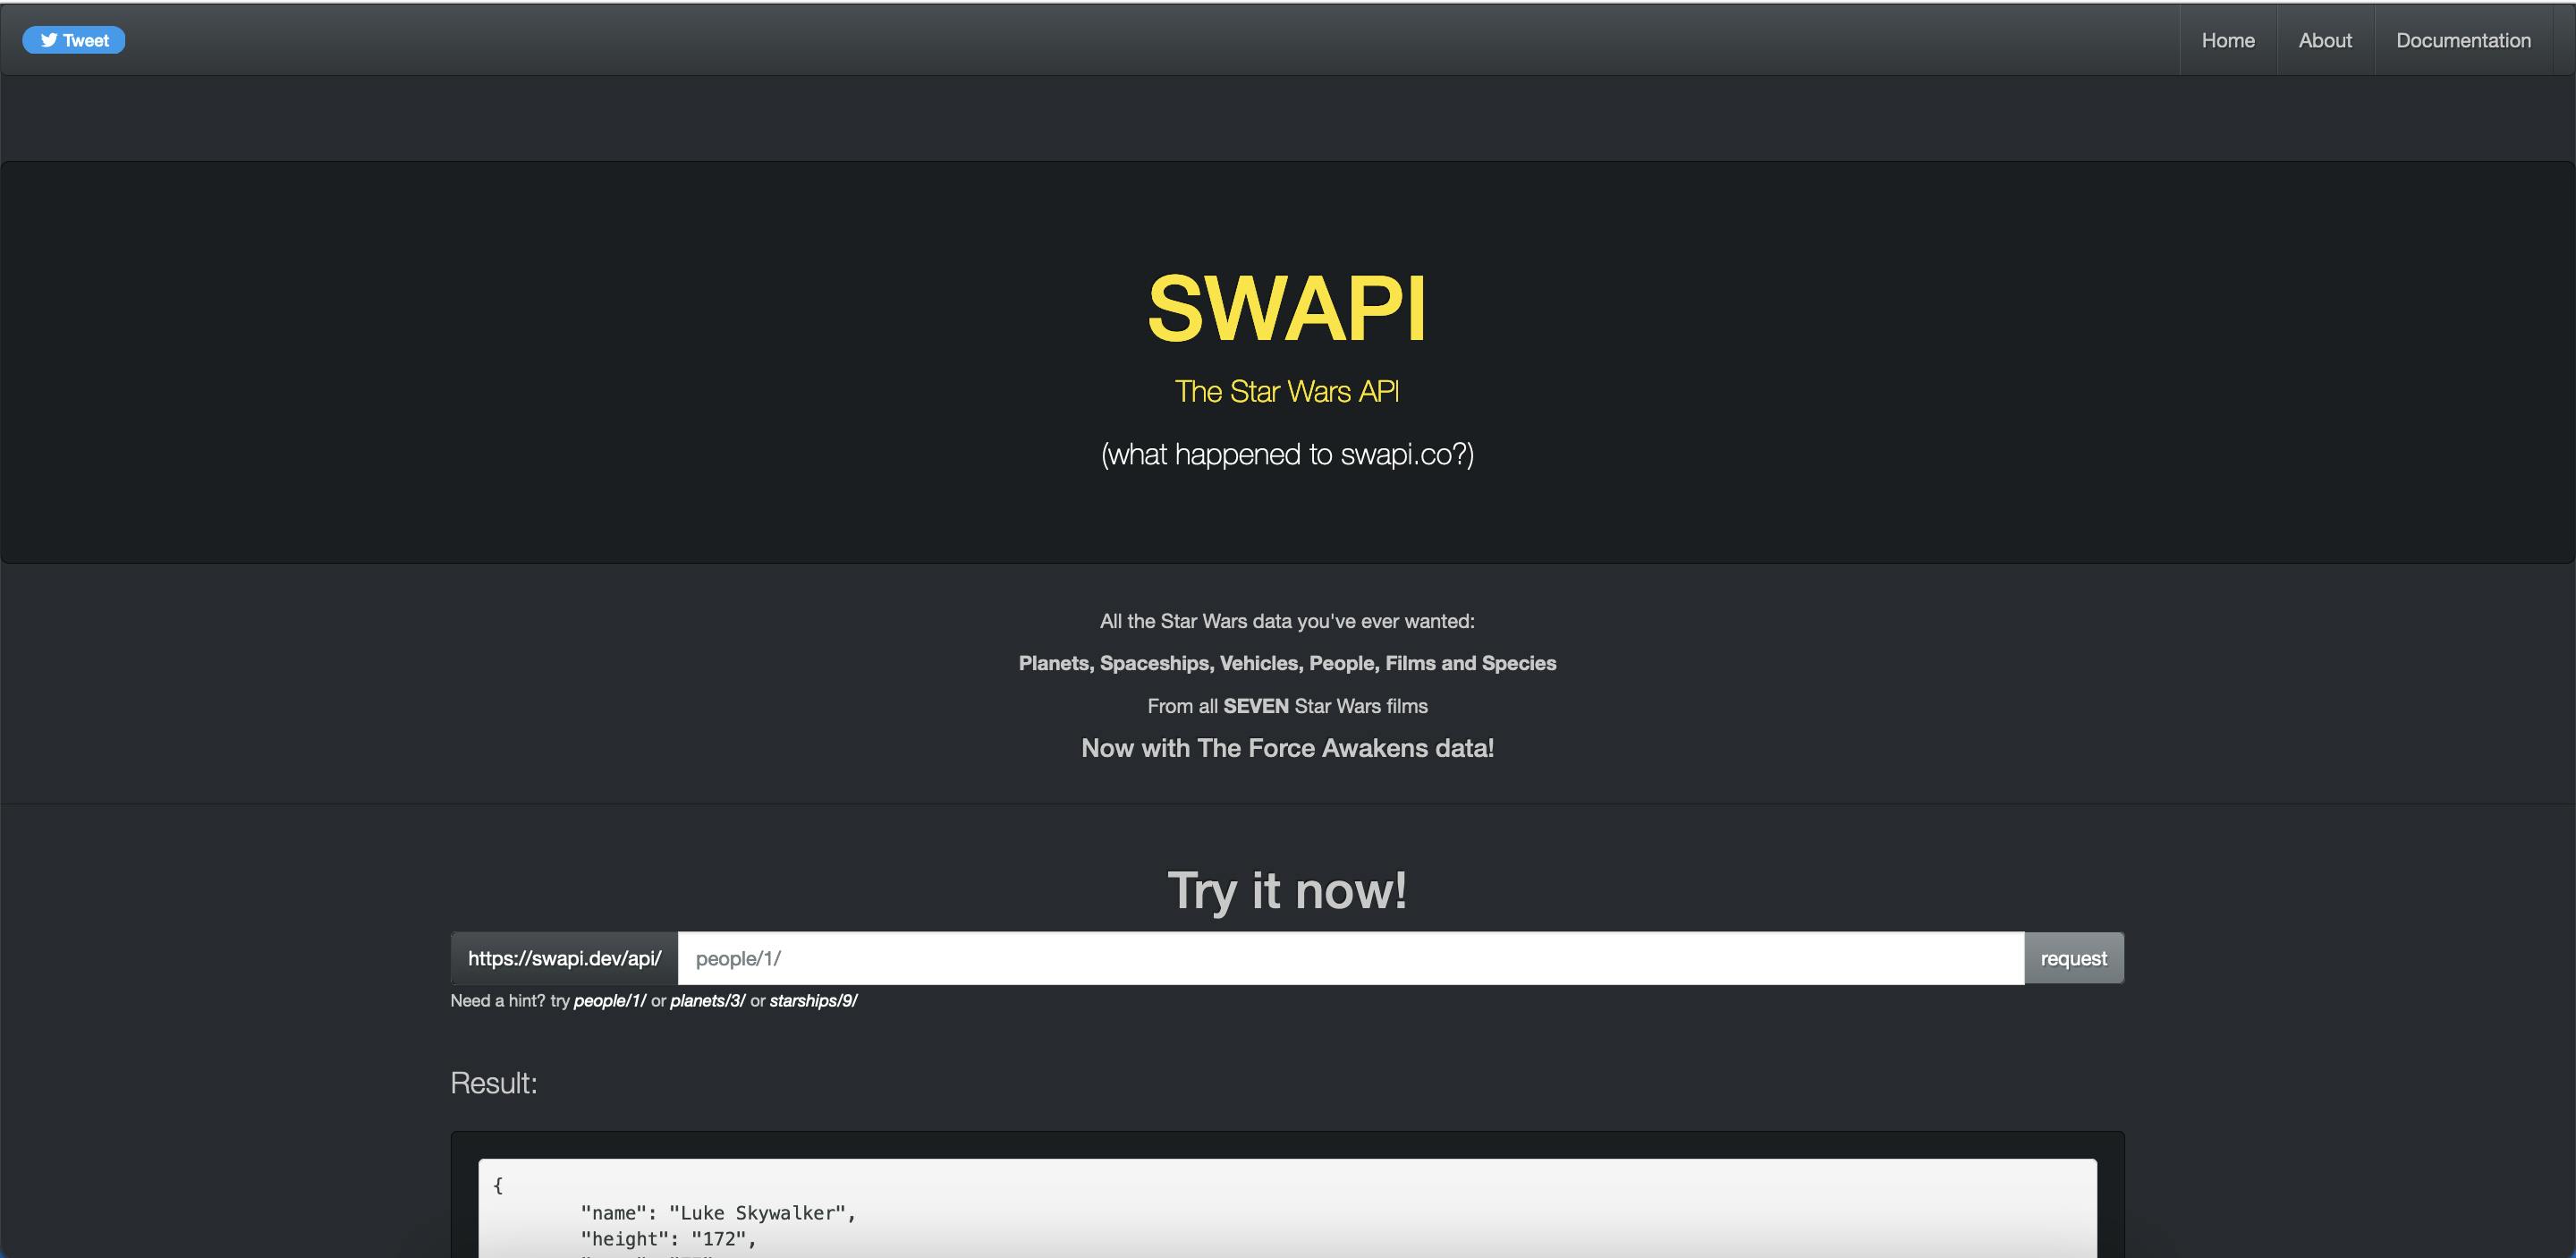
Next, we need to find some data that we can retrieve and then implement into our React application. It took me a bit to decide on a fun and simple API (Application Programming Interface), but I ended up choosing The Star Wars API - SWAPI. This one seemed like an easy-to-access API, and the data is cool! I mean come on, it's Star Wars, who doesn't love Star Wars??
And the best part: The API is free, and you won't be needing an API Key ('token') to access it!
I've provided the link above, but here it is as well:
SWAPI: Star Wars API - Click Here
(Should look like this, or similar):
Okay! Onto the fun part: Setting up our App.jsx file to be able to retrieve data from SWAPI.
Conjunction Function
Heading back to our text editor where our code is, let's reopen App.jsx and get started writing a function that will fetch the SWAPI data by using async/await. I will break down what this means to use async/await when mining for data.
The 'Base URL' that is used for SWAPI is:
https://swapi.dev/api/
We are going to use this in a variable called, API_URL like so:
const API_URL = 'https://swapi.dev/api/';
Side note: I've made this variable into all uppercase because it is a global-scope variable. What that means, is that the entire application, not just a specific portion or function, can access it. It isn't necessary to use the all-uppercase method for globals, but it is something I've always done, and haven't found a reason against it thus far in my long tech career as an engineer. However, feel free to write it in any syntax-appropriate way you'd like.
Next, we're going to create a function back inside the App() function itself, called fetchData(). This is going to be the key function to fetching and accessing the API data. To initiate the function, there are 2 ways of doing this, and each method is based solely upon which style of Function you like to use.
I prefer the Arrow Function method, as it is cleaner, but there is also the Standard Function method as well, which works just fine. The differences between these 2 methods when using async/await are as follows:
// Arrow Function
// This will be created by declaring the function by a variable name
const fetchData = async () => {
    // some cool stuff here
}
// Notice the word 'async' is the first item declared as we begin the assignment to the variable named 'fetchData'. This works the same way in a Standard Function definition.


// Standard Function
async fetchData() {
    // also cool stuff here
}
// The same ruling applies to this style of function definition, where the word 'async' must be declared first before the function declaration and naming convention.
Either method works just fine, and both accomplish the same outcomes when doing most tasks in JavaScript. There are however, some key differences between these 2 types of functions when it comes to coding overall in JavaScript and especially TypeScript, but that is a topic for another article. If you'd like to learn more about Functions, or anything JavaScript for that matter, I highly recommend the gods of Frontend coding: The MDN Docs
Let's break down real quick what async means, and why it is used here.
Async full of variables
The keyword async is a shortened version of the word 'asynchronous'. What this means is that an item is called not at the same time as another item. For example, if you have 2 items that are set to go off when something happens, an 'async Promise' means that the items will not fire off at the same time. Take for a more detailed example, the 2 function calls in the test environment from MDN Async Function Page
// This is technically the First function to be called, but it only fires after 'awaiting' for the Second function call.
function resolveAfter2Seconds() {
  return new Promise(resolve => {
    setTimeout(() => {
      resolve('resolved'); // Third return
    }, 2000); // Second return part 2
  });
}

async function asyncCall() {
  console.log('calling'); // First return
  const result = await resolveAfter2Seconds(); // Second return part 1
  console.log(result); // Fourth/Final return
  // Expected output: "resolved"
}

asyncCall();
// Output in Terminal:
> "calling" // Happens immediately
// A pause of 2000 millisenconds (2 seconds)
> "resolved" // Happens after the pause
The async keyword declares that any items being returned inside of the function will fire off separately from one another when the function is called.
We've seen the async keyword in action, but now we're going to see the await keyword and what it means to use it in an asynchronous function call.
Await off of your shoulders
The await keyword compliments the async keyword, by telling the rest of the function that it is waiting for the data to come back from the source. It's kind of like you're in a group of friends on a hike, and one of your friends falls back a few paces to tie their shoes, so you pause and wait for them to get back to you, while the rest of the group continues onward.
Typically, inside of an async function when using Promises (unless you are using .then() promise chaining), you'll find that the await keyword is used twice. Once with the fetch() keyword call for the data, and again for what to do next with the data that has been retrieved once it has been 'fetched'.
Getting back to our SWAPI (Star Wars API) data, let's create that new function called fetchData and set a single parameter inside of it called url, inside of our App.jsx file. Then we can call it directly beneath the declaration, using the global API_URL variable we created earlier as the argument for the function.
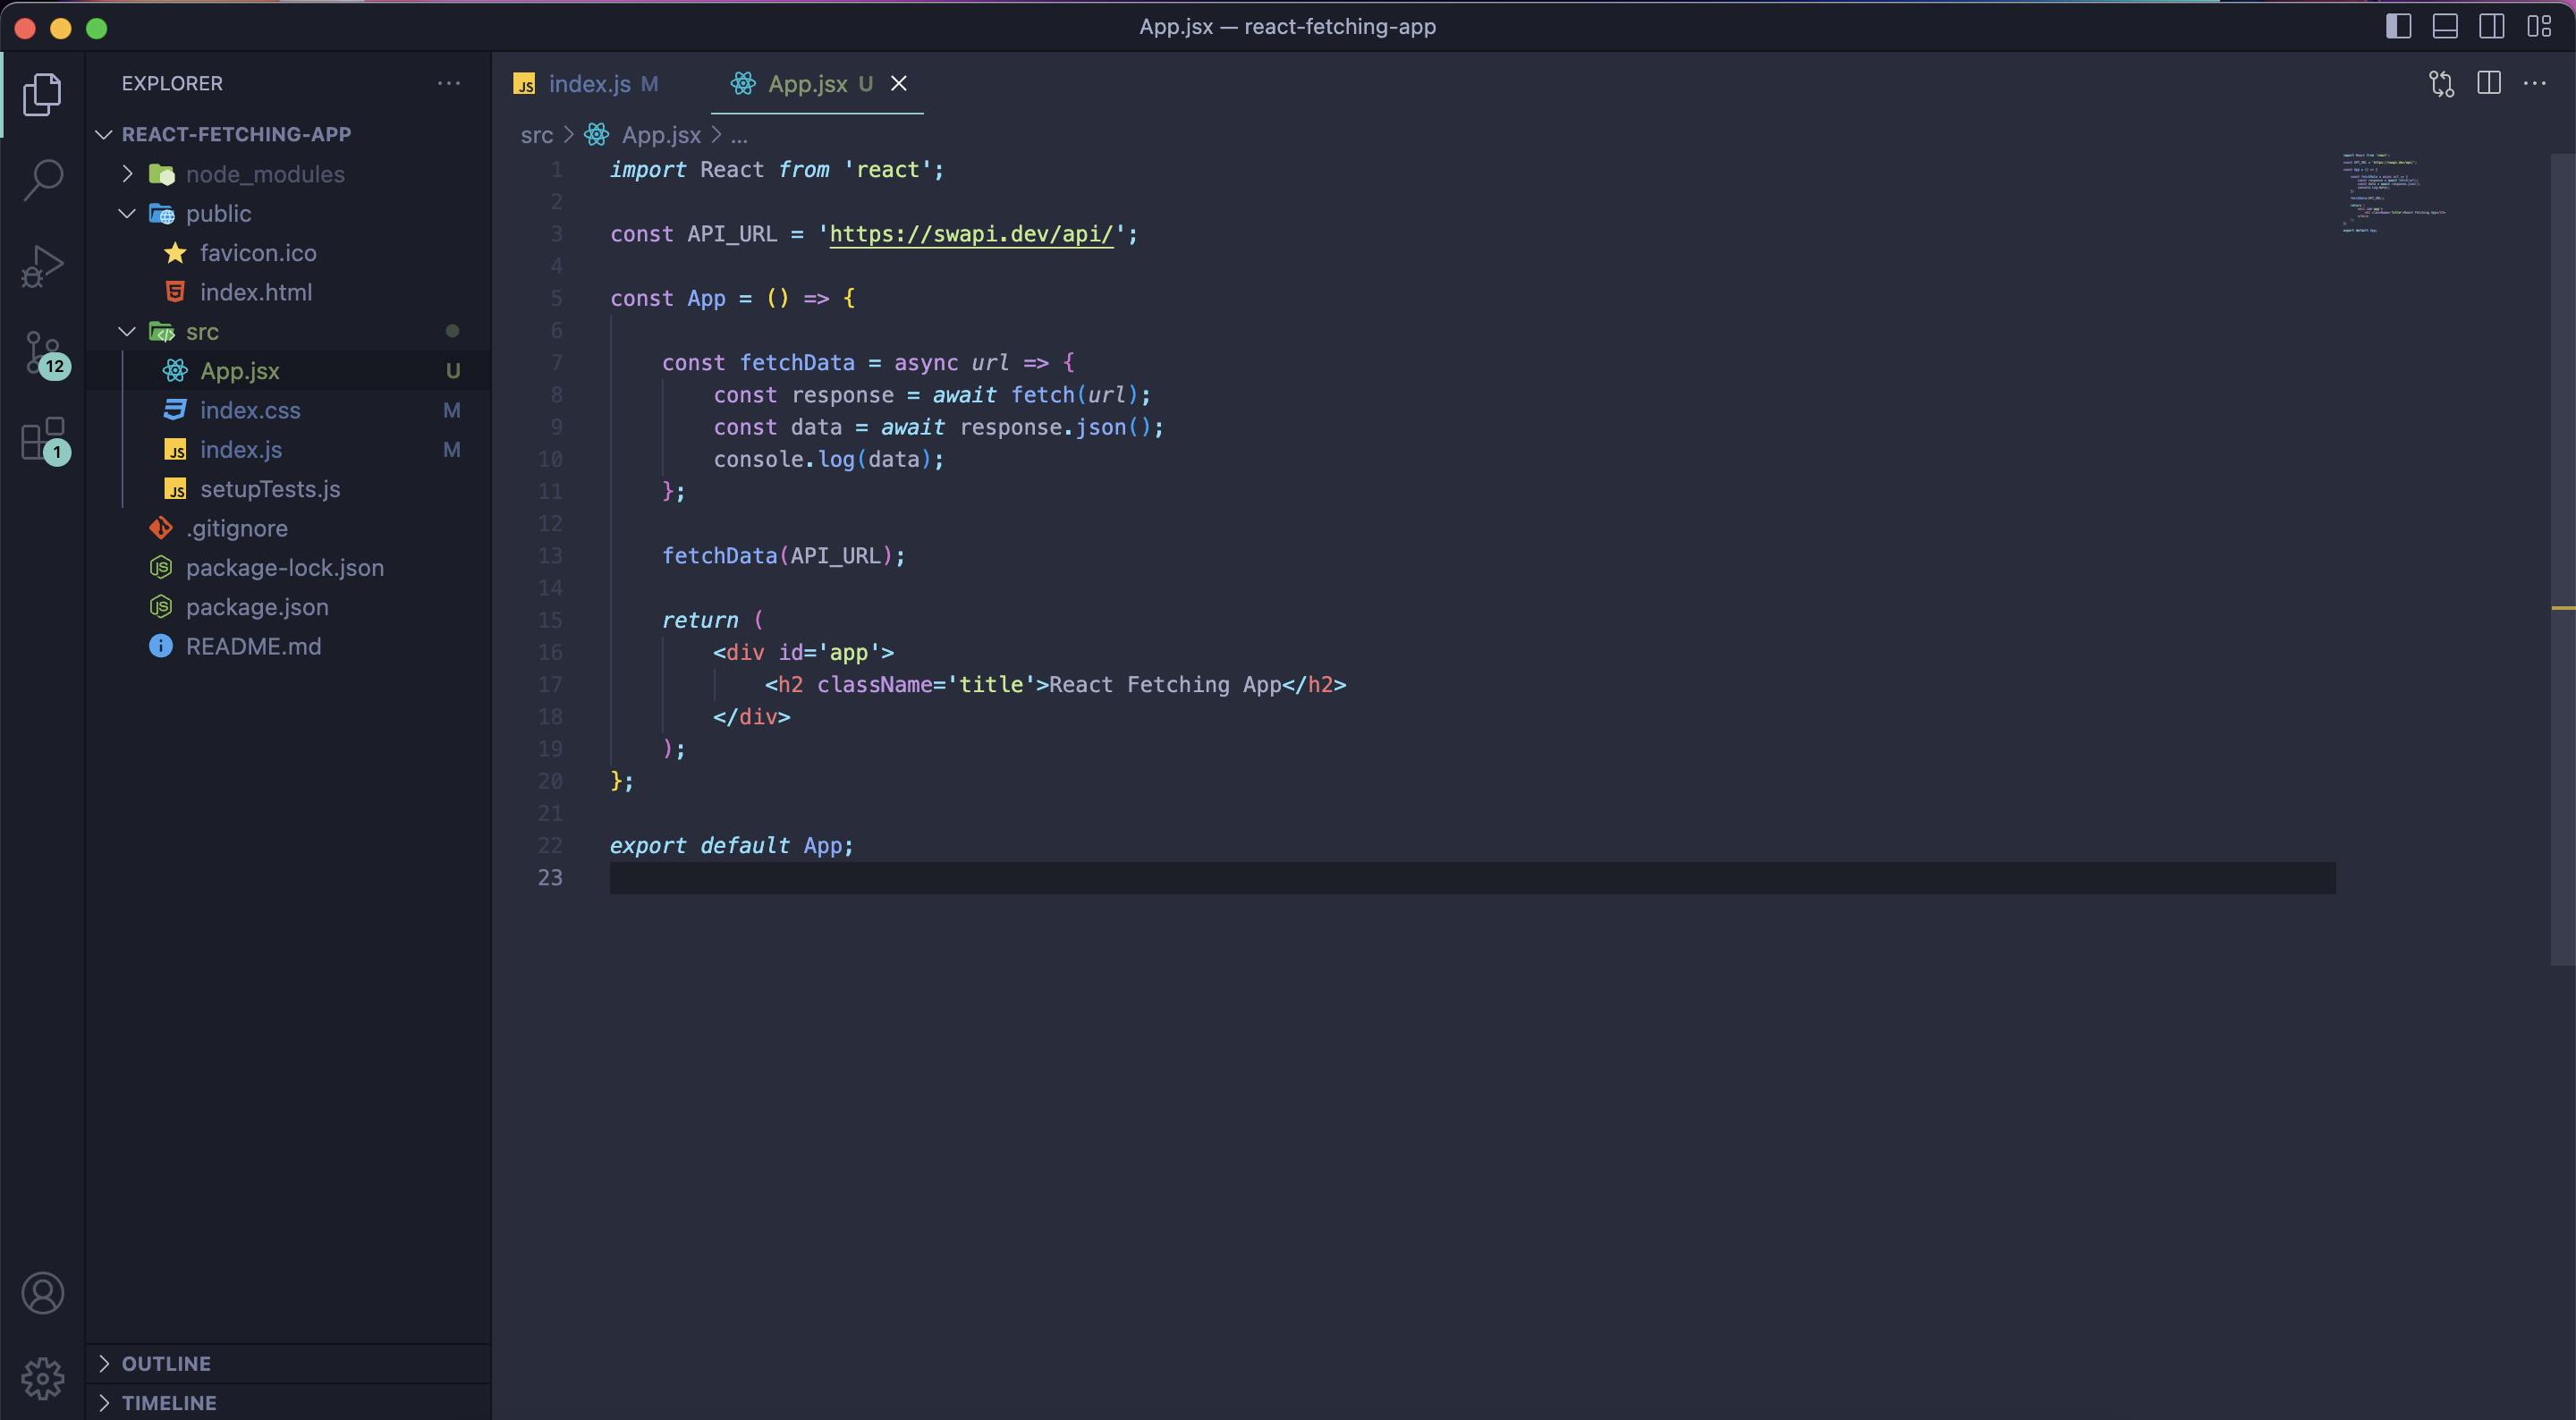
For anyone that needs the full code to simply copy and paste, here it is:
import React from 'react';
const API_URL = 'https://swapi.dev/api/';

const App = () => {

    const fetchData = async url => {
        const response = await fetch(url);
        const data = await response.json();
        console.log(data);
    };

    fetchData(API_URL);

    return (
        <div id='app'>
            <h2 className='title'>React Fetching App</h2>
        </div>
    );
};
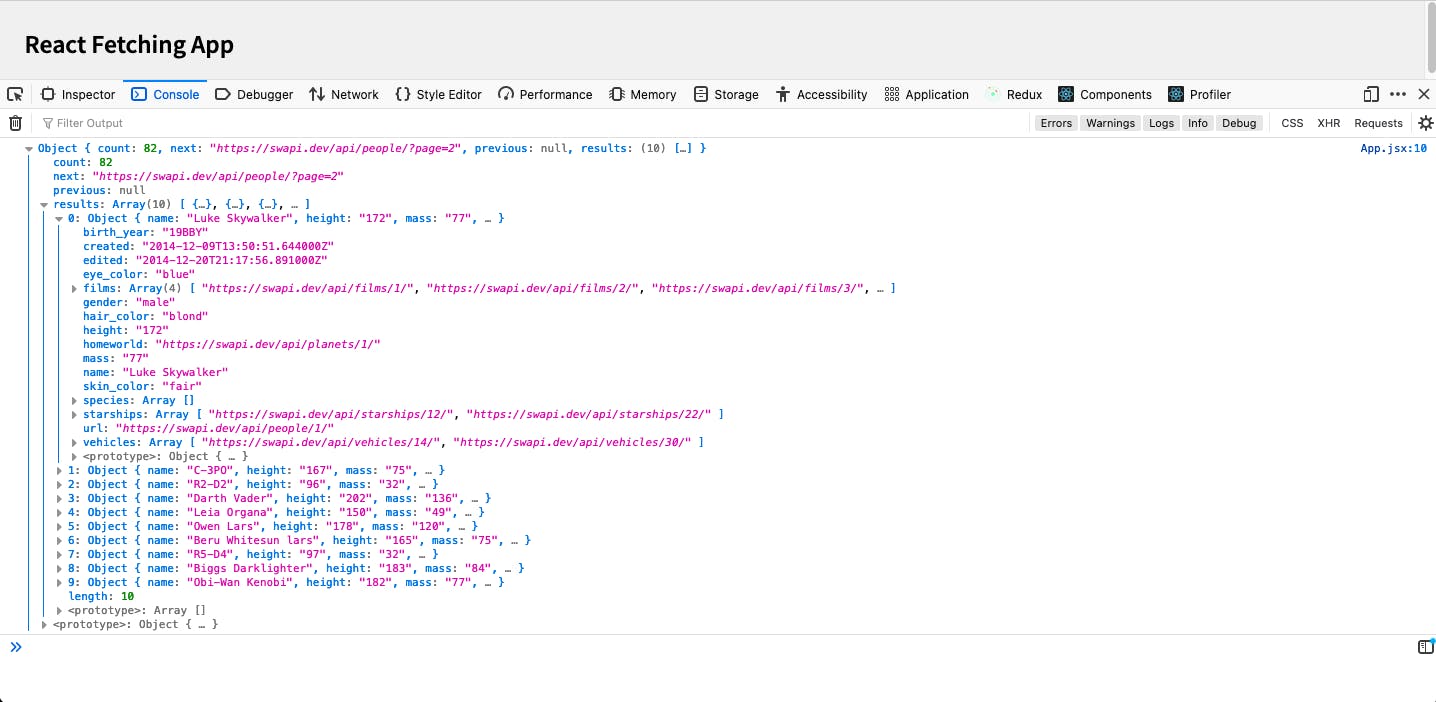
Go ahead and save the file, and then pop open your browser window that has the React app open. Once you do, open up the DevTools (Chrome or Firefox are recommended, but Safari and Edge work as well), and click on the tab Console.
This window is what you should see, and if not, simply refresh the page (cmd+r / ctrl+r), or go back to your editor and make sure your code looks correct.
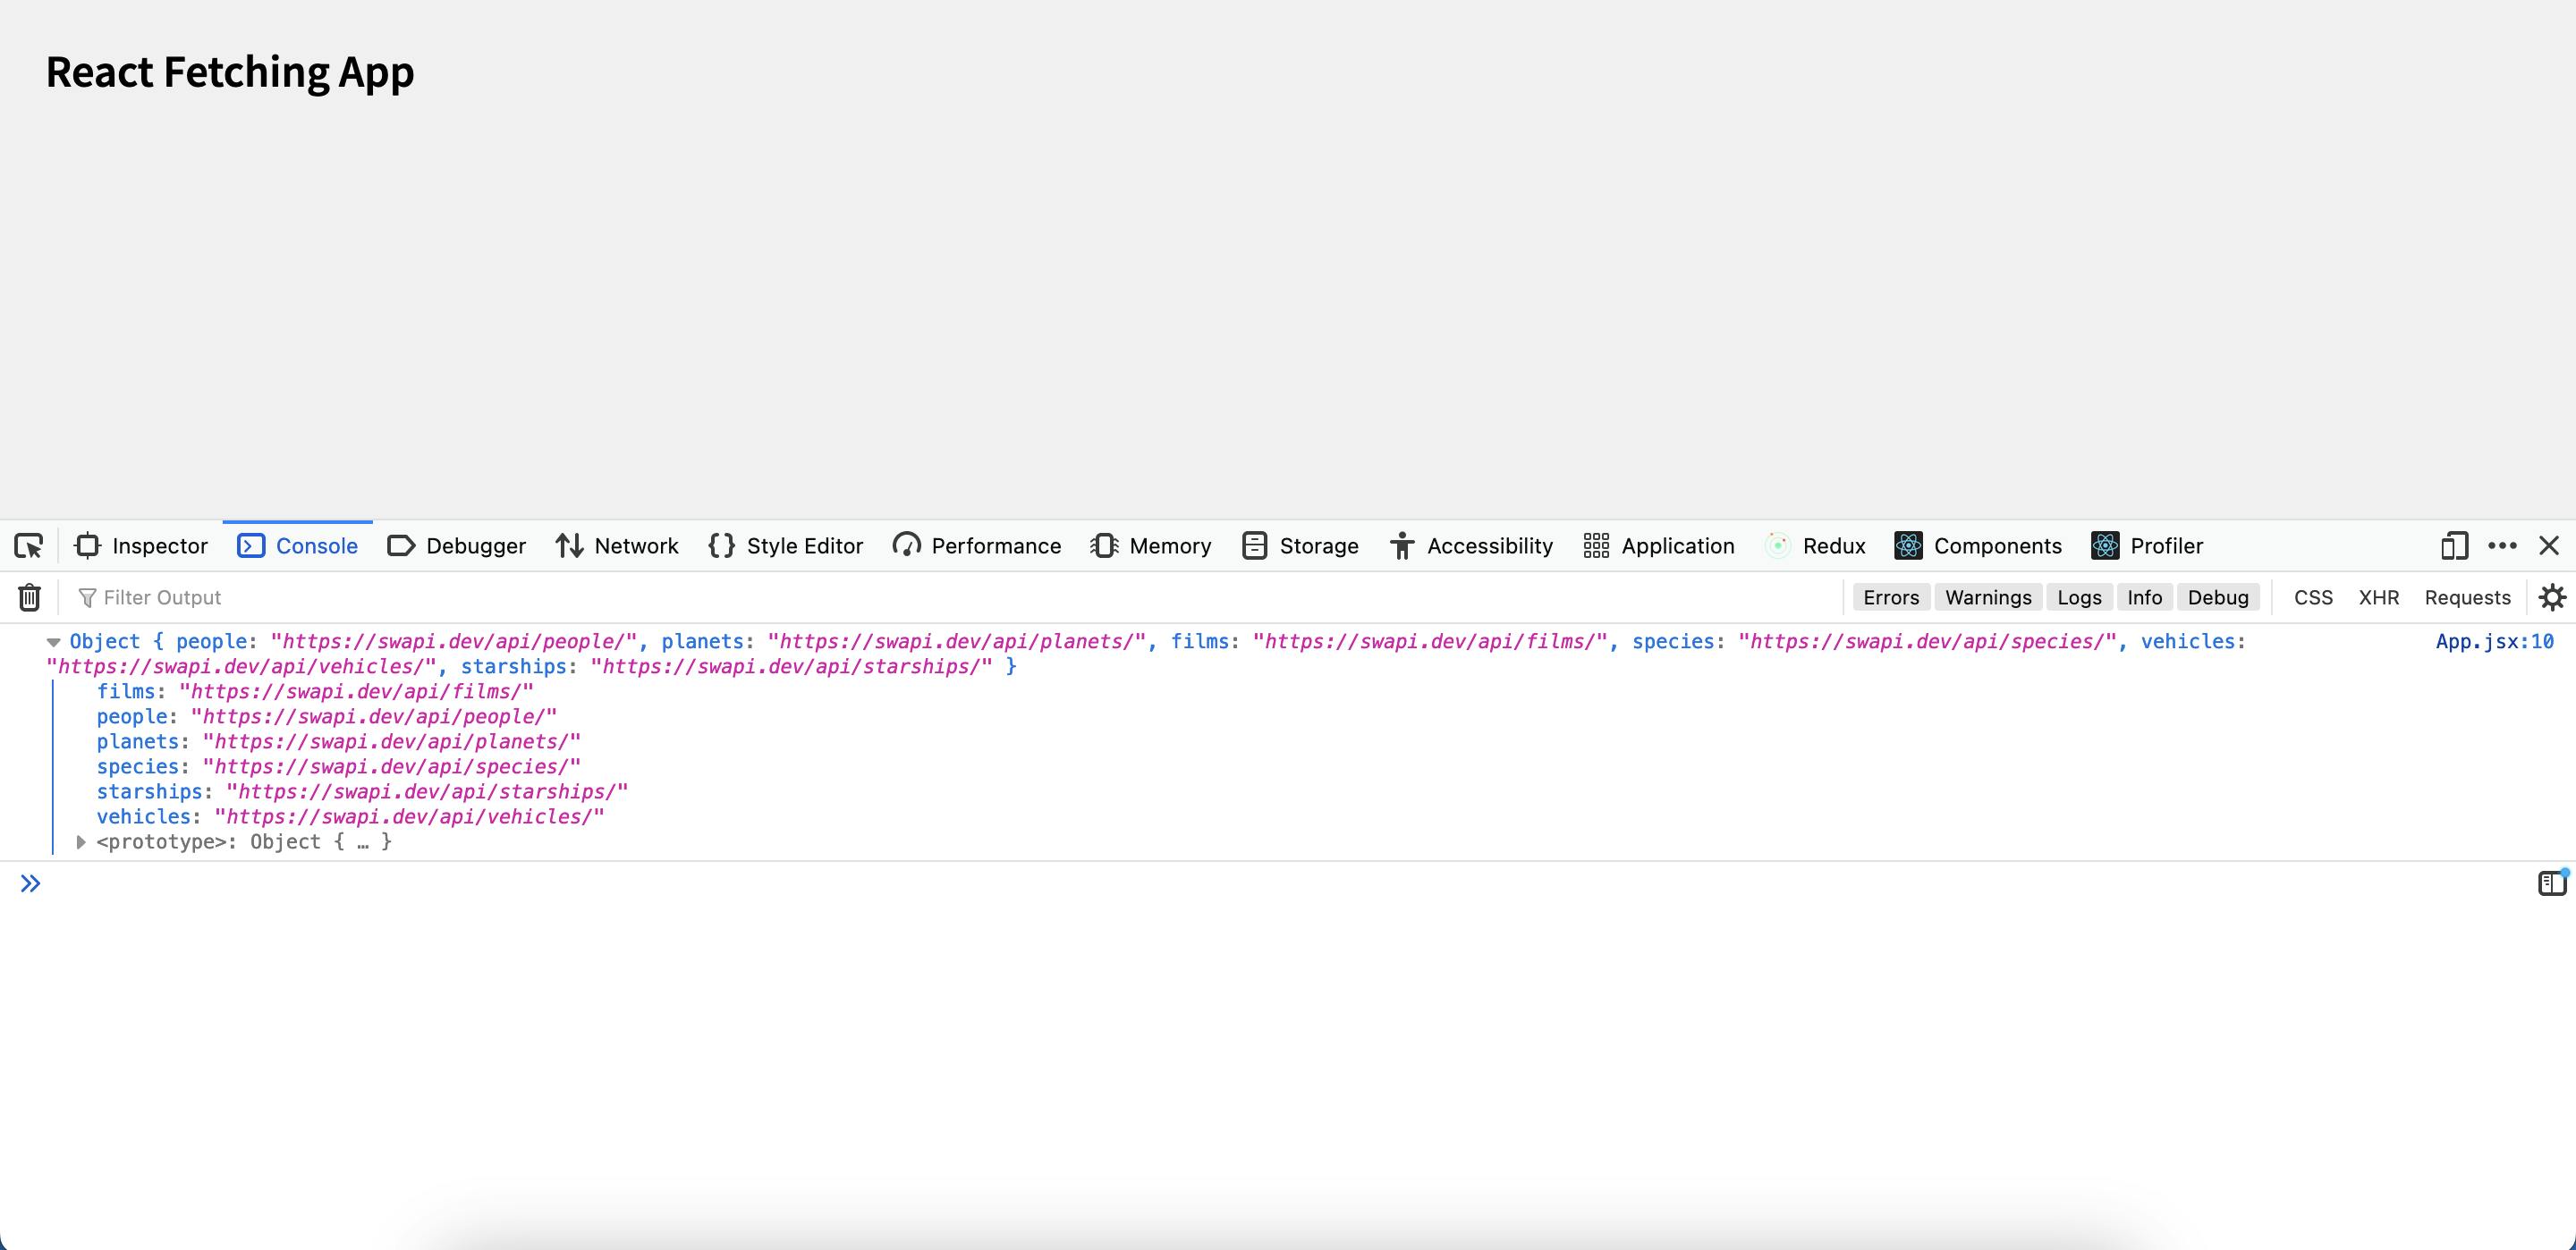
If you see the above screen, success! You have officially fetched some data from an API call, using fetch and async/await.
Now, you've done the fun part of fetching the data using async/await. But if you stick around, we are going to actually put that data to work and make it functional! That's where the real fun stuff comes into play.
No, not 'Jason'...JSON
So far, you've learned about fetching data, async and await keywords, a little bit of function knowledge to get you by, and what it all means to use it in practice. But now we're going to put that data we've just retrieved to good use.
We are going to map through the data, and filter it all out by like items/content (or**, key** and value pairs).
This data we've just ported over has been configured into what is called JSON format. All this means is that the information is broken up by an 'item name' and an 'item value'. In programming, we call this a key/value pair. It looks something like this:
[
    {
        "id": 1,
        "first_name": "Tyler",
        "occupation": "Web/Software Engineer",
        "cool_person": false
    }
];
Let's break this down real quick:
Key: The identifier (or title) of a piece of data/content.
Value: The content matching the specific key.
Example:
Key: first_name
Value: Tyler
So, in essence, when we 'pull' this data from the API, we are then converting it into JSON. This data then becomes fragmented by key identifiers and corresponding values, so that we can read it and filter (or map) through it properly on our end of the code.
Okay! Onto the mapping through all of our new Star Wars API data.
Don't forget the Map on your journey
If you have used JavaScript (or really most programming languages) for longer than a couple of hours, then chances are you're already familiar with what is called mapping. In JS specifically, there is a predefined method called .map() that allows you to (as the name states) map through whatever data it is that you're working with while using .map().
Let's see this in practice.
First, let's change up the url path of the API data that we're fetching currently. If you notice inside the object of the returned call in the DevTools, you will see different sections/areas such as people, planets, films, etc. We are going to pick one (in this case, people), and retrieve that specific set of data from the API.
Going back to our fetchData() function, we will alter the fetch call just a bit on the first line of the function.
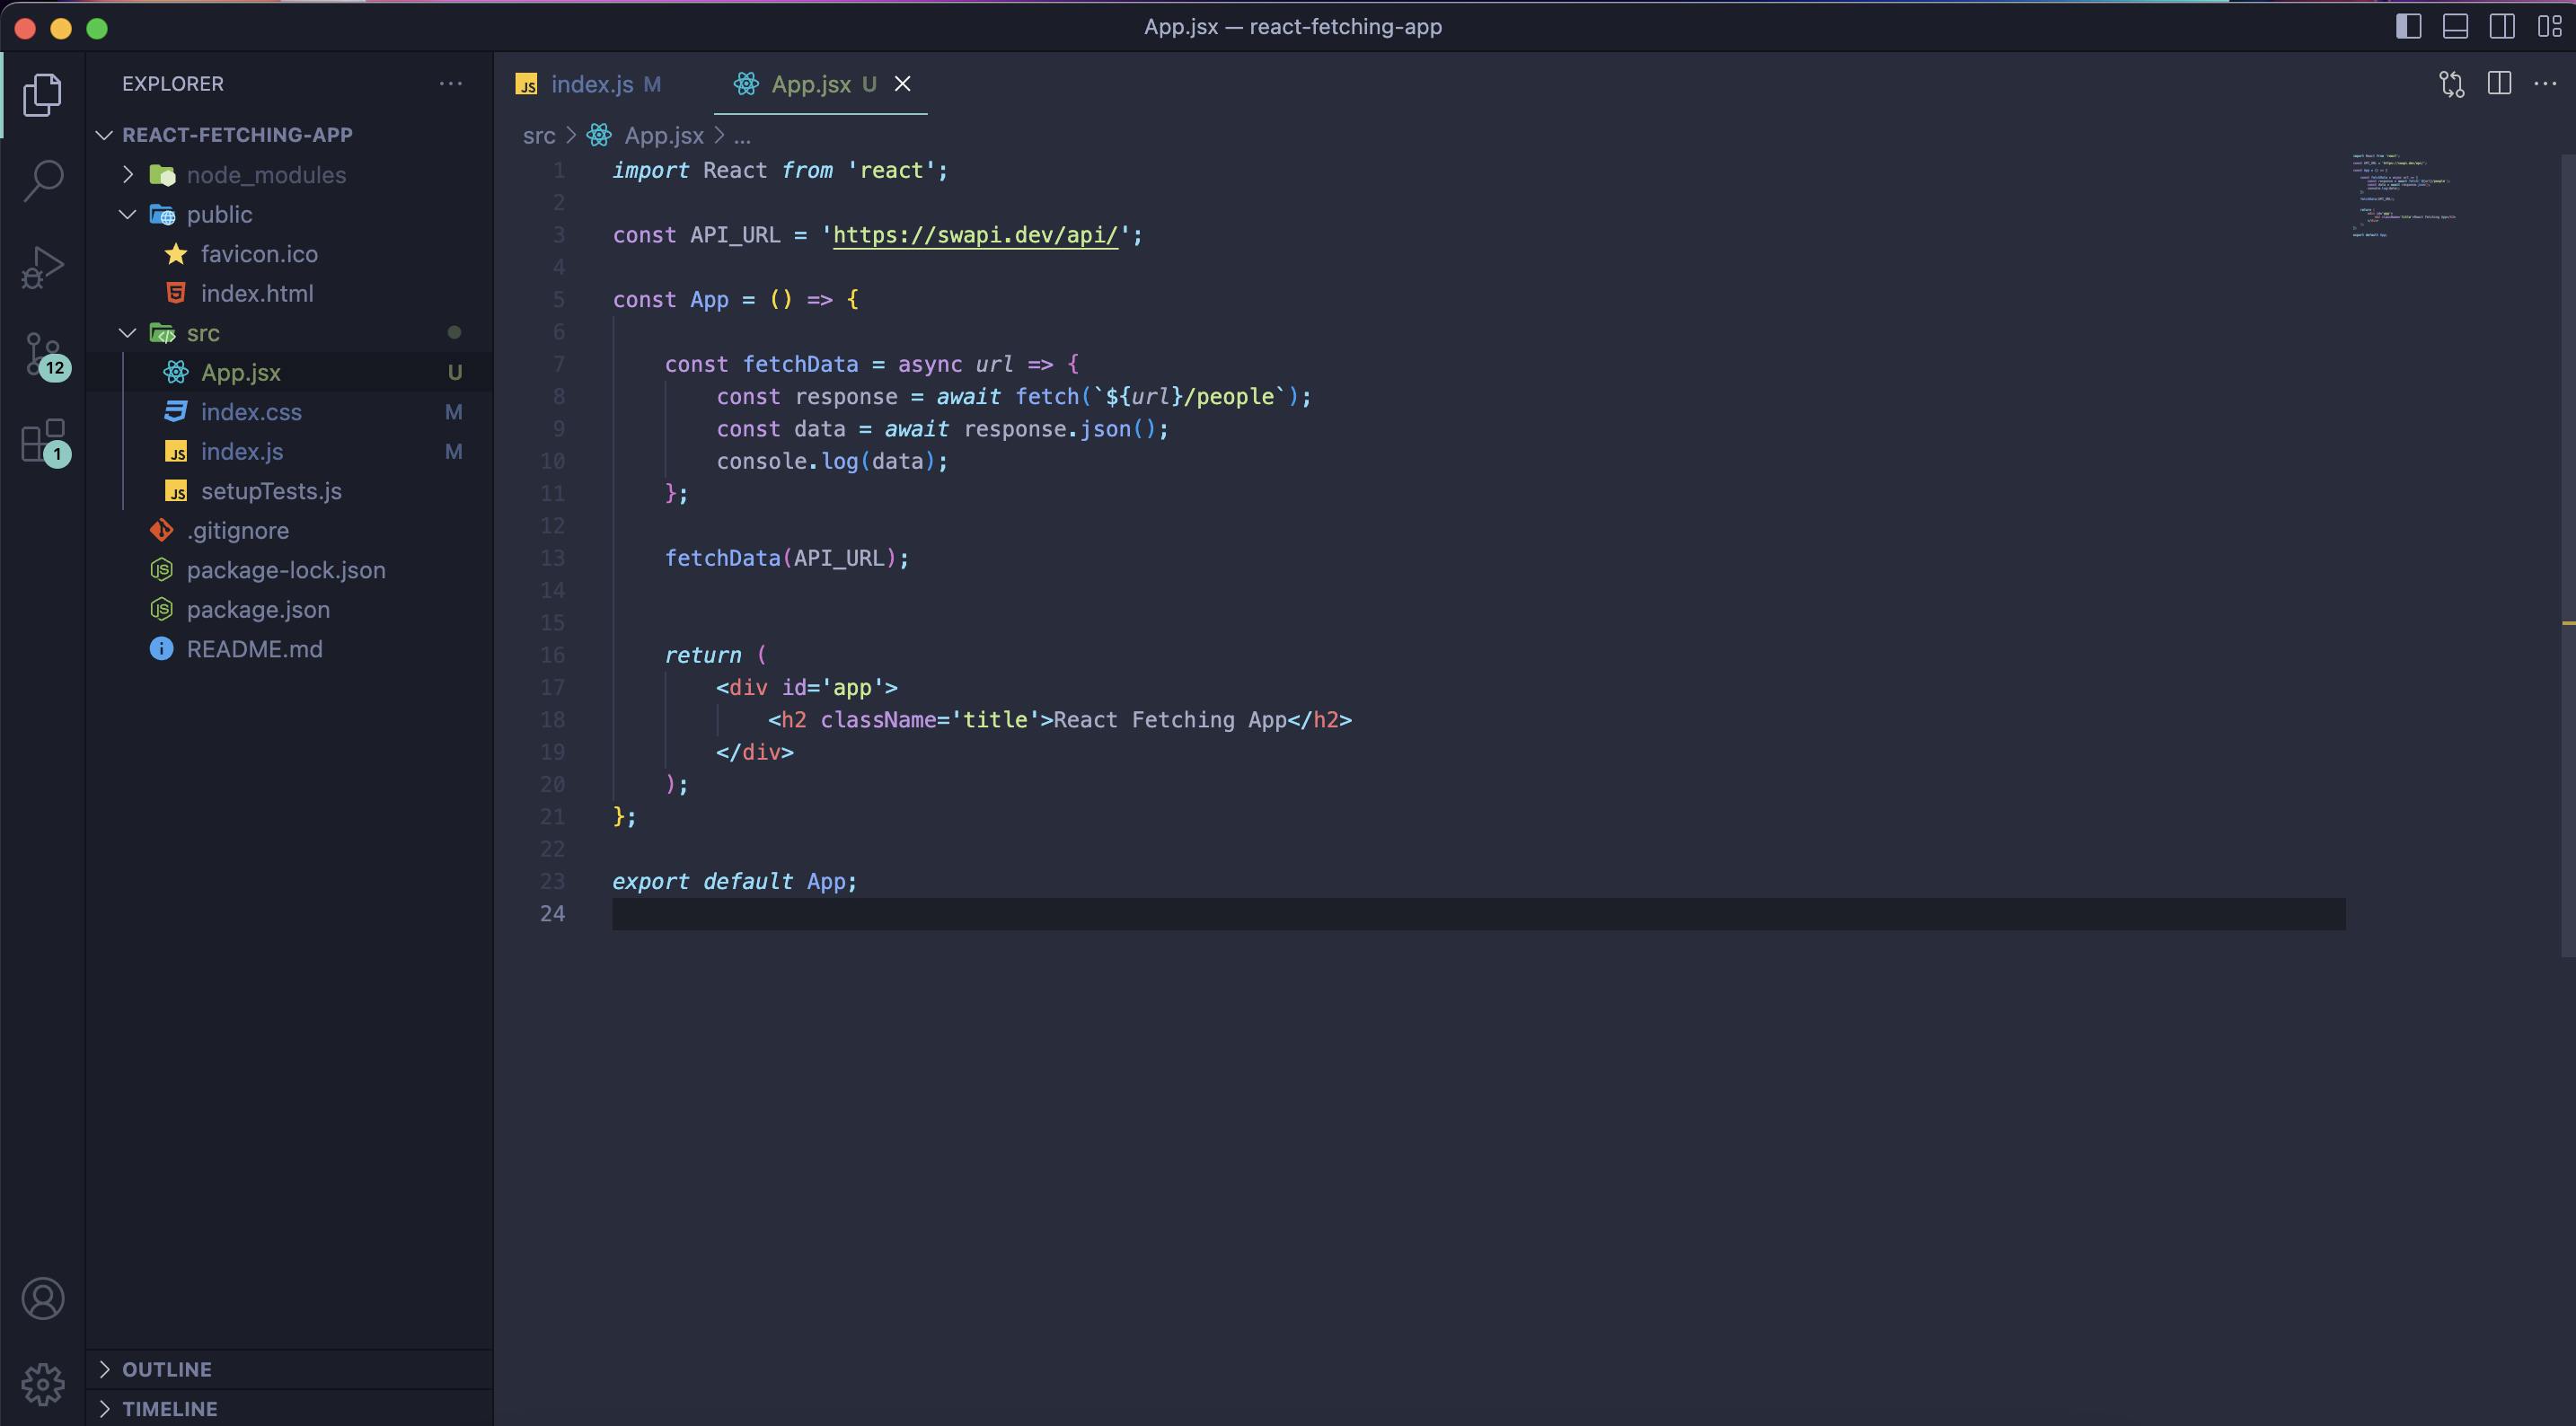
For the copy-and-pasters of the world:
import React from 'react';
const API_URL = 'https://swapi.dev/api/';

const App = () => {
    const fetchData = async url => {
        const response = await fetch(`${url}/people`);
        const data = await response.json();
        console.log(data);
    };
    fetchData(API_URL);
    return (
        <div id='app'>
            <h2 className='title'>React Fetching App</h2>
        </div>
    );
};
export default App;
Now that we've logged that new section of data from the API, we should see something like this in the DevTools: (if it doesn't work, remember to refresh the page)
From here, you can see all of the cool new data we can pick through and use for our app. So, let's start with setting up a div container and inside of it, making a ul element (unordered list as compared to a numbered order list) that can list all of the data information.
For future note, you can essentially put this data however you'd like on your future apps like a table for example. But here, I just simply want to get you - the reader - to the comfortable point of fetching data and then learning how to use said data properly.
Go ahead and underneath the h2 element, create a div with the class name (or in React, className on HTML elements) of container. Then inside that container element, create a ul element and an li element inside of it, like so:
...
return (
    <div id='app'>
        <h2 className='title'>React Fetching App</h2>
        <div className="container">
            <ul>
                <li></li>
            </ul>
         </div>
    </div>
);
//We are going to alter the information going inside of that li element
Now, we can start mapping through the data we've pulled, but first, let's go ahead and use a little neato React Hook called useState so we can actually set the data up into a scoped variable, and then implement that variable as a container for the data.
The useState of the Union
At the very top of our App.jsx file, we are going to import the useState() Hook from the React library.
import React, { useState } from 'react';

// ... rest of the App.jsx file ..
So now we can go ahead and create 2 variables: one to set the data, and one to hold the data. And to make it simple, we'll just call it person, since that's the section of the SWAPI data we're going after for our app.
Directly on the first line of the inside of our App() function, we will create this person variable along with its counterpart setPerson, using what is called 'array destructuring' in JS. It will look like this:
const [person, setPerson] = useState([]);
Notice that when we initialize these 2 variables with the useState() hook, we are using a base value of an empty array []. What this means, is that at the core value for the variable - if nothing is used or returned with it - then simply an empty array will be returned. useState is a very straightforward React Hook, and it can be used in a myriad of ways, like pulling text data, for example, would look something like this:
const [myName, setMyName] = useState('tyler');
What this tells the app, is that the initial value of the destructured variable is 'tyler'. This can also be left as a blank string like useState(' ').
The camelCase naming convention when it comes to state is seen everywhere, but it's only because it's a trend that was first started when the React team initially designed and pushed out the useState hook convention. I've been known to use underscores or justlowercasestyle before, so it's dealer's choice really. But again, typically, you will see a lot more of the camelCase styling than anything else.
Back to using the variables we've created, we want to use the secondary variable called, setPerson as a 'setter' (topic for another time) for our person variable. We are going to set this person variable inside of our fetchData() function and use the data that we've retrieved as the filler.
const fetchData = async url => {
    ...
    console.log(data);
    setPerson(data.results);
};
Remember, data is the whole return of the API, and results is the selection (key identifier) for the SWAPI data. So, to get this section of the data, we need to chain down to it by saying, "Enter through data, and then grab everything under the results key with all of its values".
Now, so we can get this fetchData() function up and running every time we refresh our page, we're going to use a cleaner method instead of just calling it at the bottom of the App() function. We will use what is called the useEffect React Hook.
For good useEffect, use this...
The useEffect Hook is used to do almost exactly what the name implies, "use an effect". Some examples of good effects are, fetching data (duh), manipulating the DOM, and setting timeouts for specific sections of code to fire off when they need to do so. Here, in our case, we will be using it to fire off when the page (or, in most use cases, the data itself) is changed/refreshed. Typically, you will see this used for Backend data being altered now and again, depending on the app and the API(s) being used. Again though, a topic for another time.
And, if you'd like to learn more about the useEffect hook, I highly recommend checking out the React docs themselves on their newly fashioned and updated website React.dev.
Link to the React - useEffect Hook
At the top of the App file, inside the curly braces for the import React line, we are going to also import useEffect, like so:
import React, { useState, useEffect } from 'react';
Now, back to inside the App() function itself, underneath the fetchData() function, let's implement the useEffect hook, by calling fetchData() inside of it, using an initial function call.
useEffect(() => {
    fetchData(API_URL);
}, []);
Notice the empty array at the end of the initial function call. What this is used for, is to set a 'changing state variable' that will be relied on from the useEffect() function.
Currently, since we don't foresee any new Star Wars movies coming out any time soon, or any new data being altered or changed, we do not actually need to implement the person variable there at this time. But, if your data variable was to have current/continuous changes happening, it would be good to place that inside of the square array brackets. For this app, however, we're good to go as it stands.
This is what your App.jsx file should look like, currently:
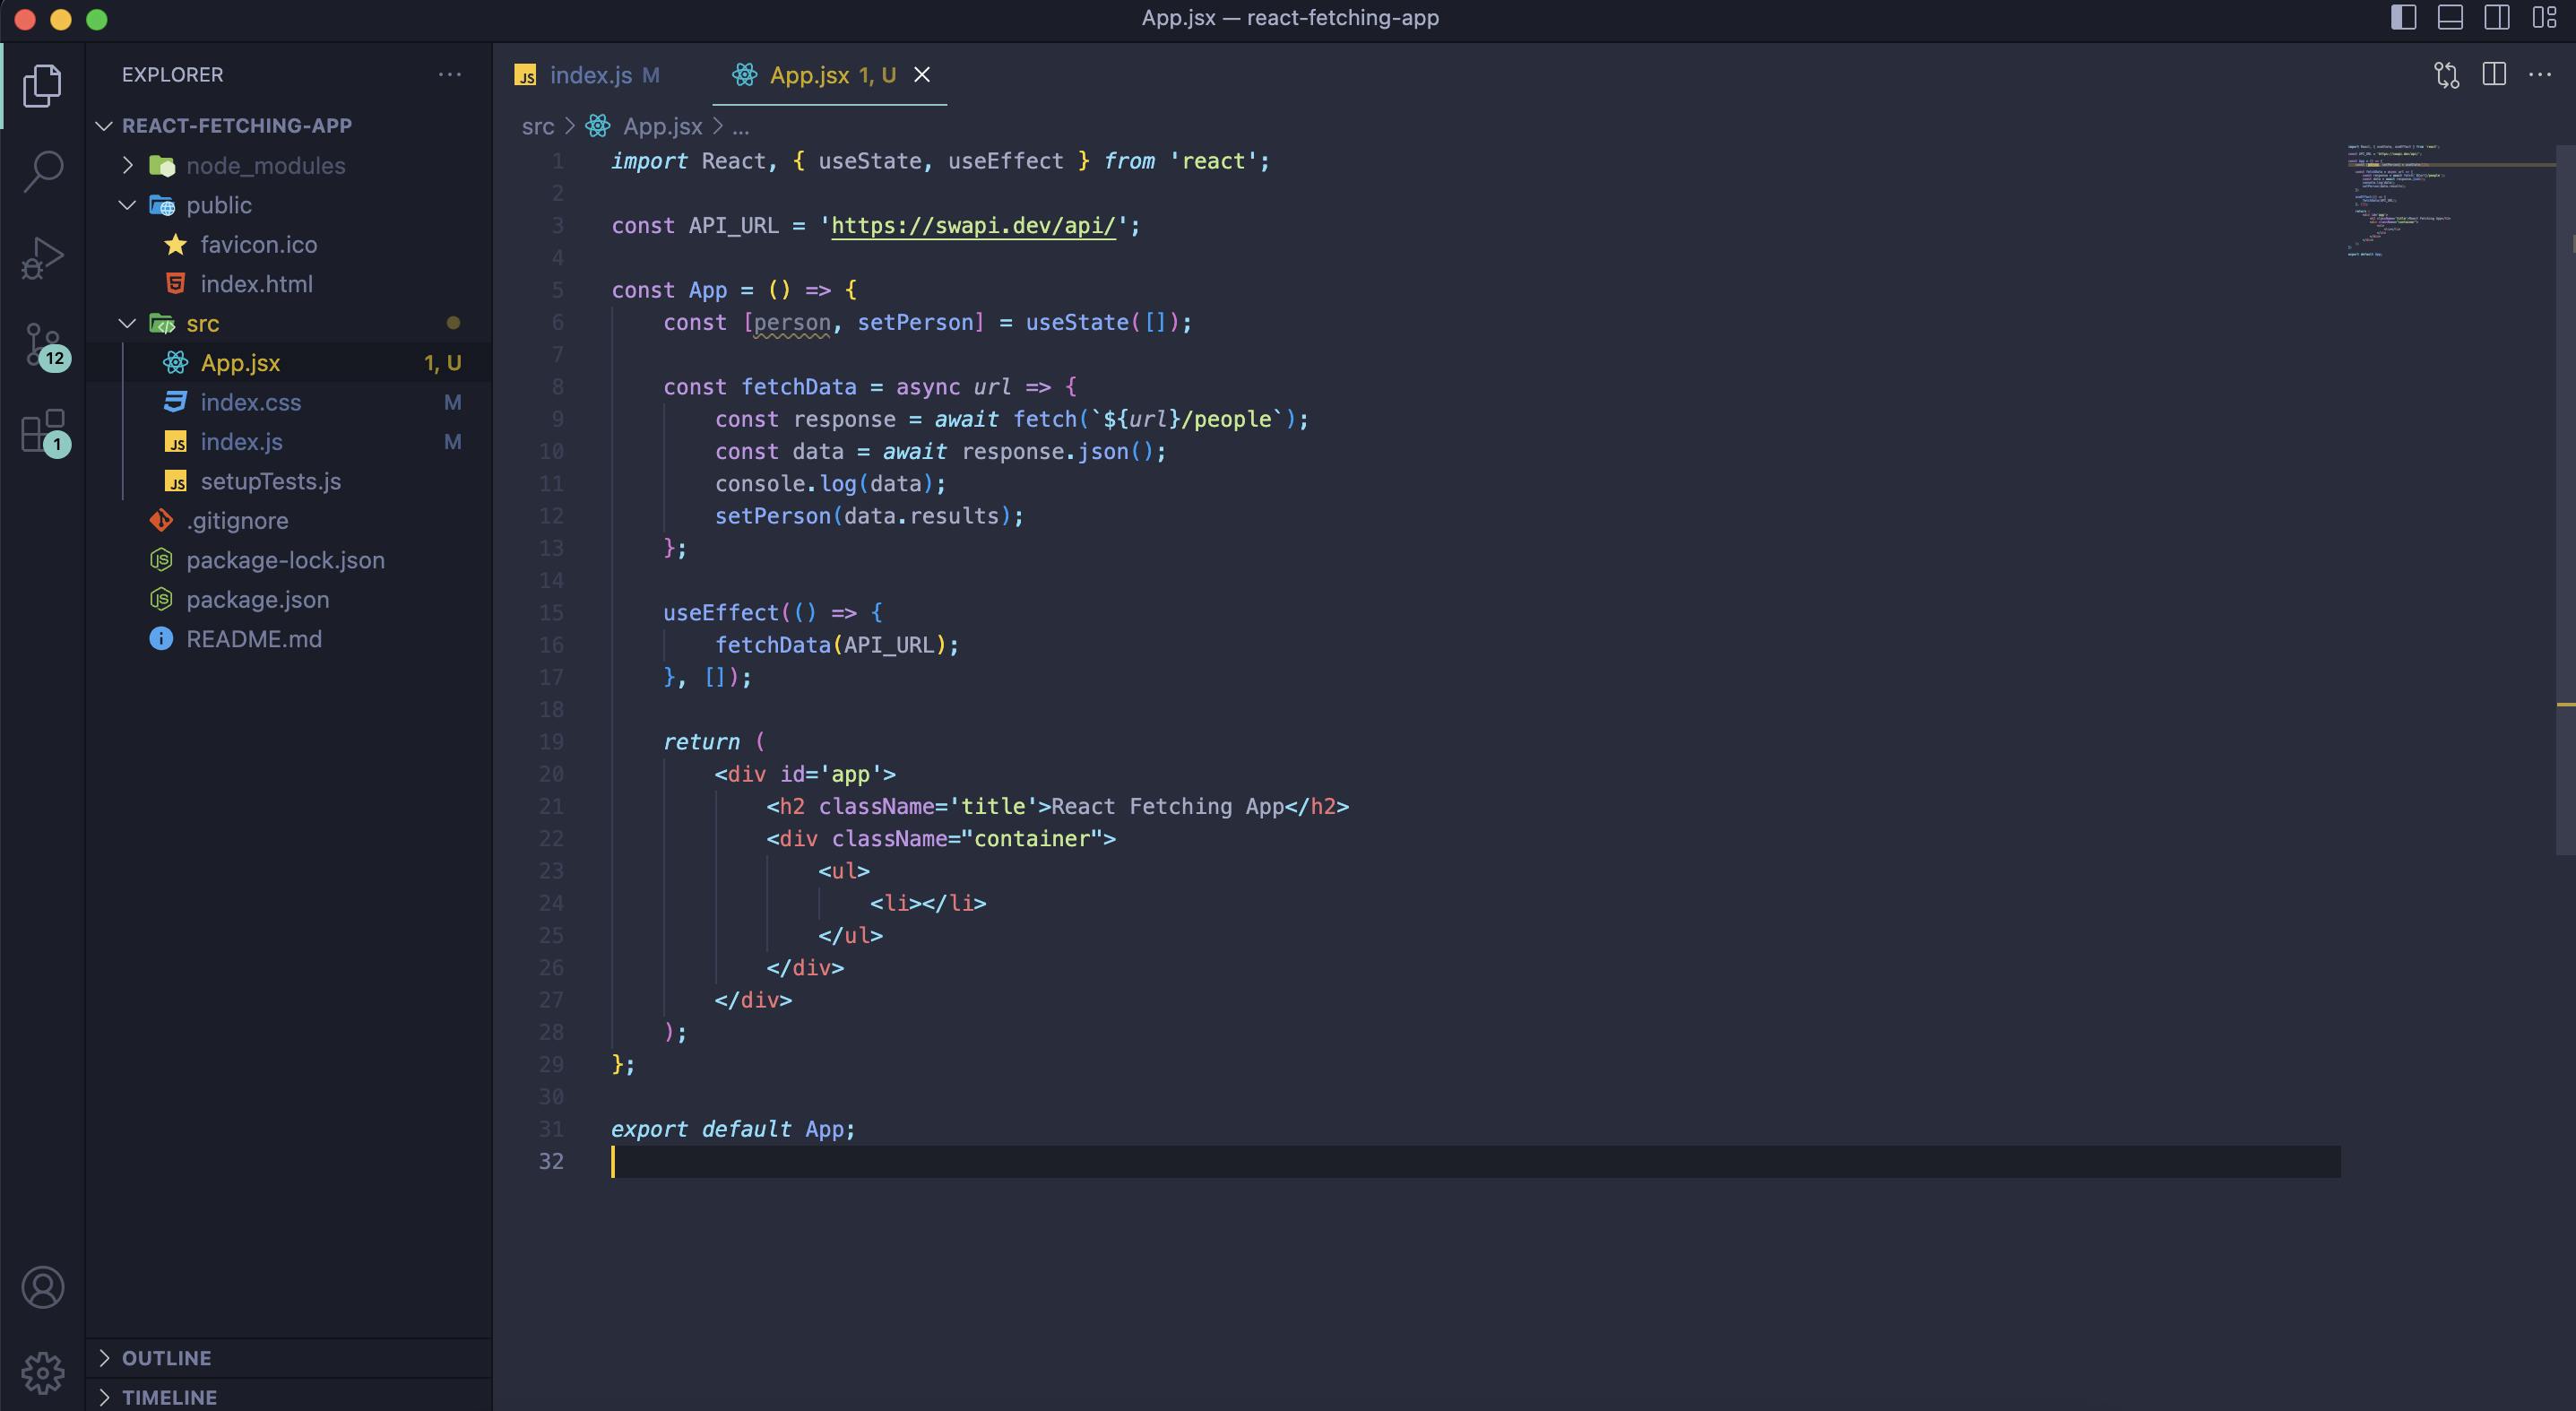
Okay so now that we've got that up and running, let's make sure this works. Head over to your browser window where you have localhost:3000 open, make sure your DevTools are up on your screen with the Console tab displayed, and click refresh on the page. If you see the data still being populated inside the Console tab, then you're on the right track!
A quick geeky side note for all of my network speed junkies out there: I have also noticed that the SWAPI (Star Wars API) does inherently have a - very brief, but still somewhat noticeable to the trained eye - lag as the page is refreshed. Unfortunately, this is not my API, it is free and open-source, but I can assure you it is not an issue overall while coding along with this article. You're gonna be just fine, I promise. Just don't look at your Network tab in the DevTools, and pretend the short 1.98-second lag doesn't exist. It can't hurt you so long as you forget about it. Unlike the monsters under your bed.
Last Person in is a rotten variable!
As I'm sure you have noticed, if you have a good linter in your text editor of choice, or are using VS Code, your variable person has a weird pseudo-error squiggly line underneath it. This is simply because we have not provided it with any TLC as of yet, which we are about to do.
So, let's put our person variable to good use, inside of our unordered list element. We are going to .map() through this person data, and then return/display said data as an <li> element, along with giving each one a specific key as a sole identifier for that piece of data. I realize to someone new to this, it may seem a bit confusing, but code along here and I guarantee this will make sense by the next part.
Inside of our <ul> element, let's get rid of our already created li element, and open up a pair of curly braces like so:
<div className="container">
    <ul>
        {}
    </ul>
</div>
Here, in this set of curly braces, is where the real React magic happens. We can put things like variables in here, mathematical equations, or simply a bunch of nonsense, so long as it's related to JS in some way. In React though, we typically use this for either inserting variables, data, or setting up a pre-created function. In our case, the usage will be for mapping through the person variable data that we set earlier inside of our fetchData() function.
To start, we will call the person variable, chain the .map() function to it, and give that .map() an initial function. Inside of this function setup, we are going to give it 2 parameters to use: item and index. The item parameter will be used as the pinpointer that maps through the data, pulling what we want from it, and the index parameter will be used as a key identifier (or, an index) for each li element.
Let's see this in action.
<div className='container'>
    <ul>
        {person.map((item, index) => (
            <li key={index}>{item.name}</li>
        ))}
    </ul>
</div>
If you'll notice, unlike a regular function that will open up with curly braces like { ... }, here we have used parentheses ( ), because we are explicitly returning something like HTML. If we were let's say also computing some other code inside of it, then we would use the { } instead. But as you can see, the only thing we needed the mapping call to do, was to return our data in a cool and HTML-friendly way.
By now at the final checkpoint, your App.jsx file should look something like this:
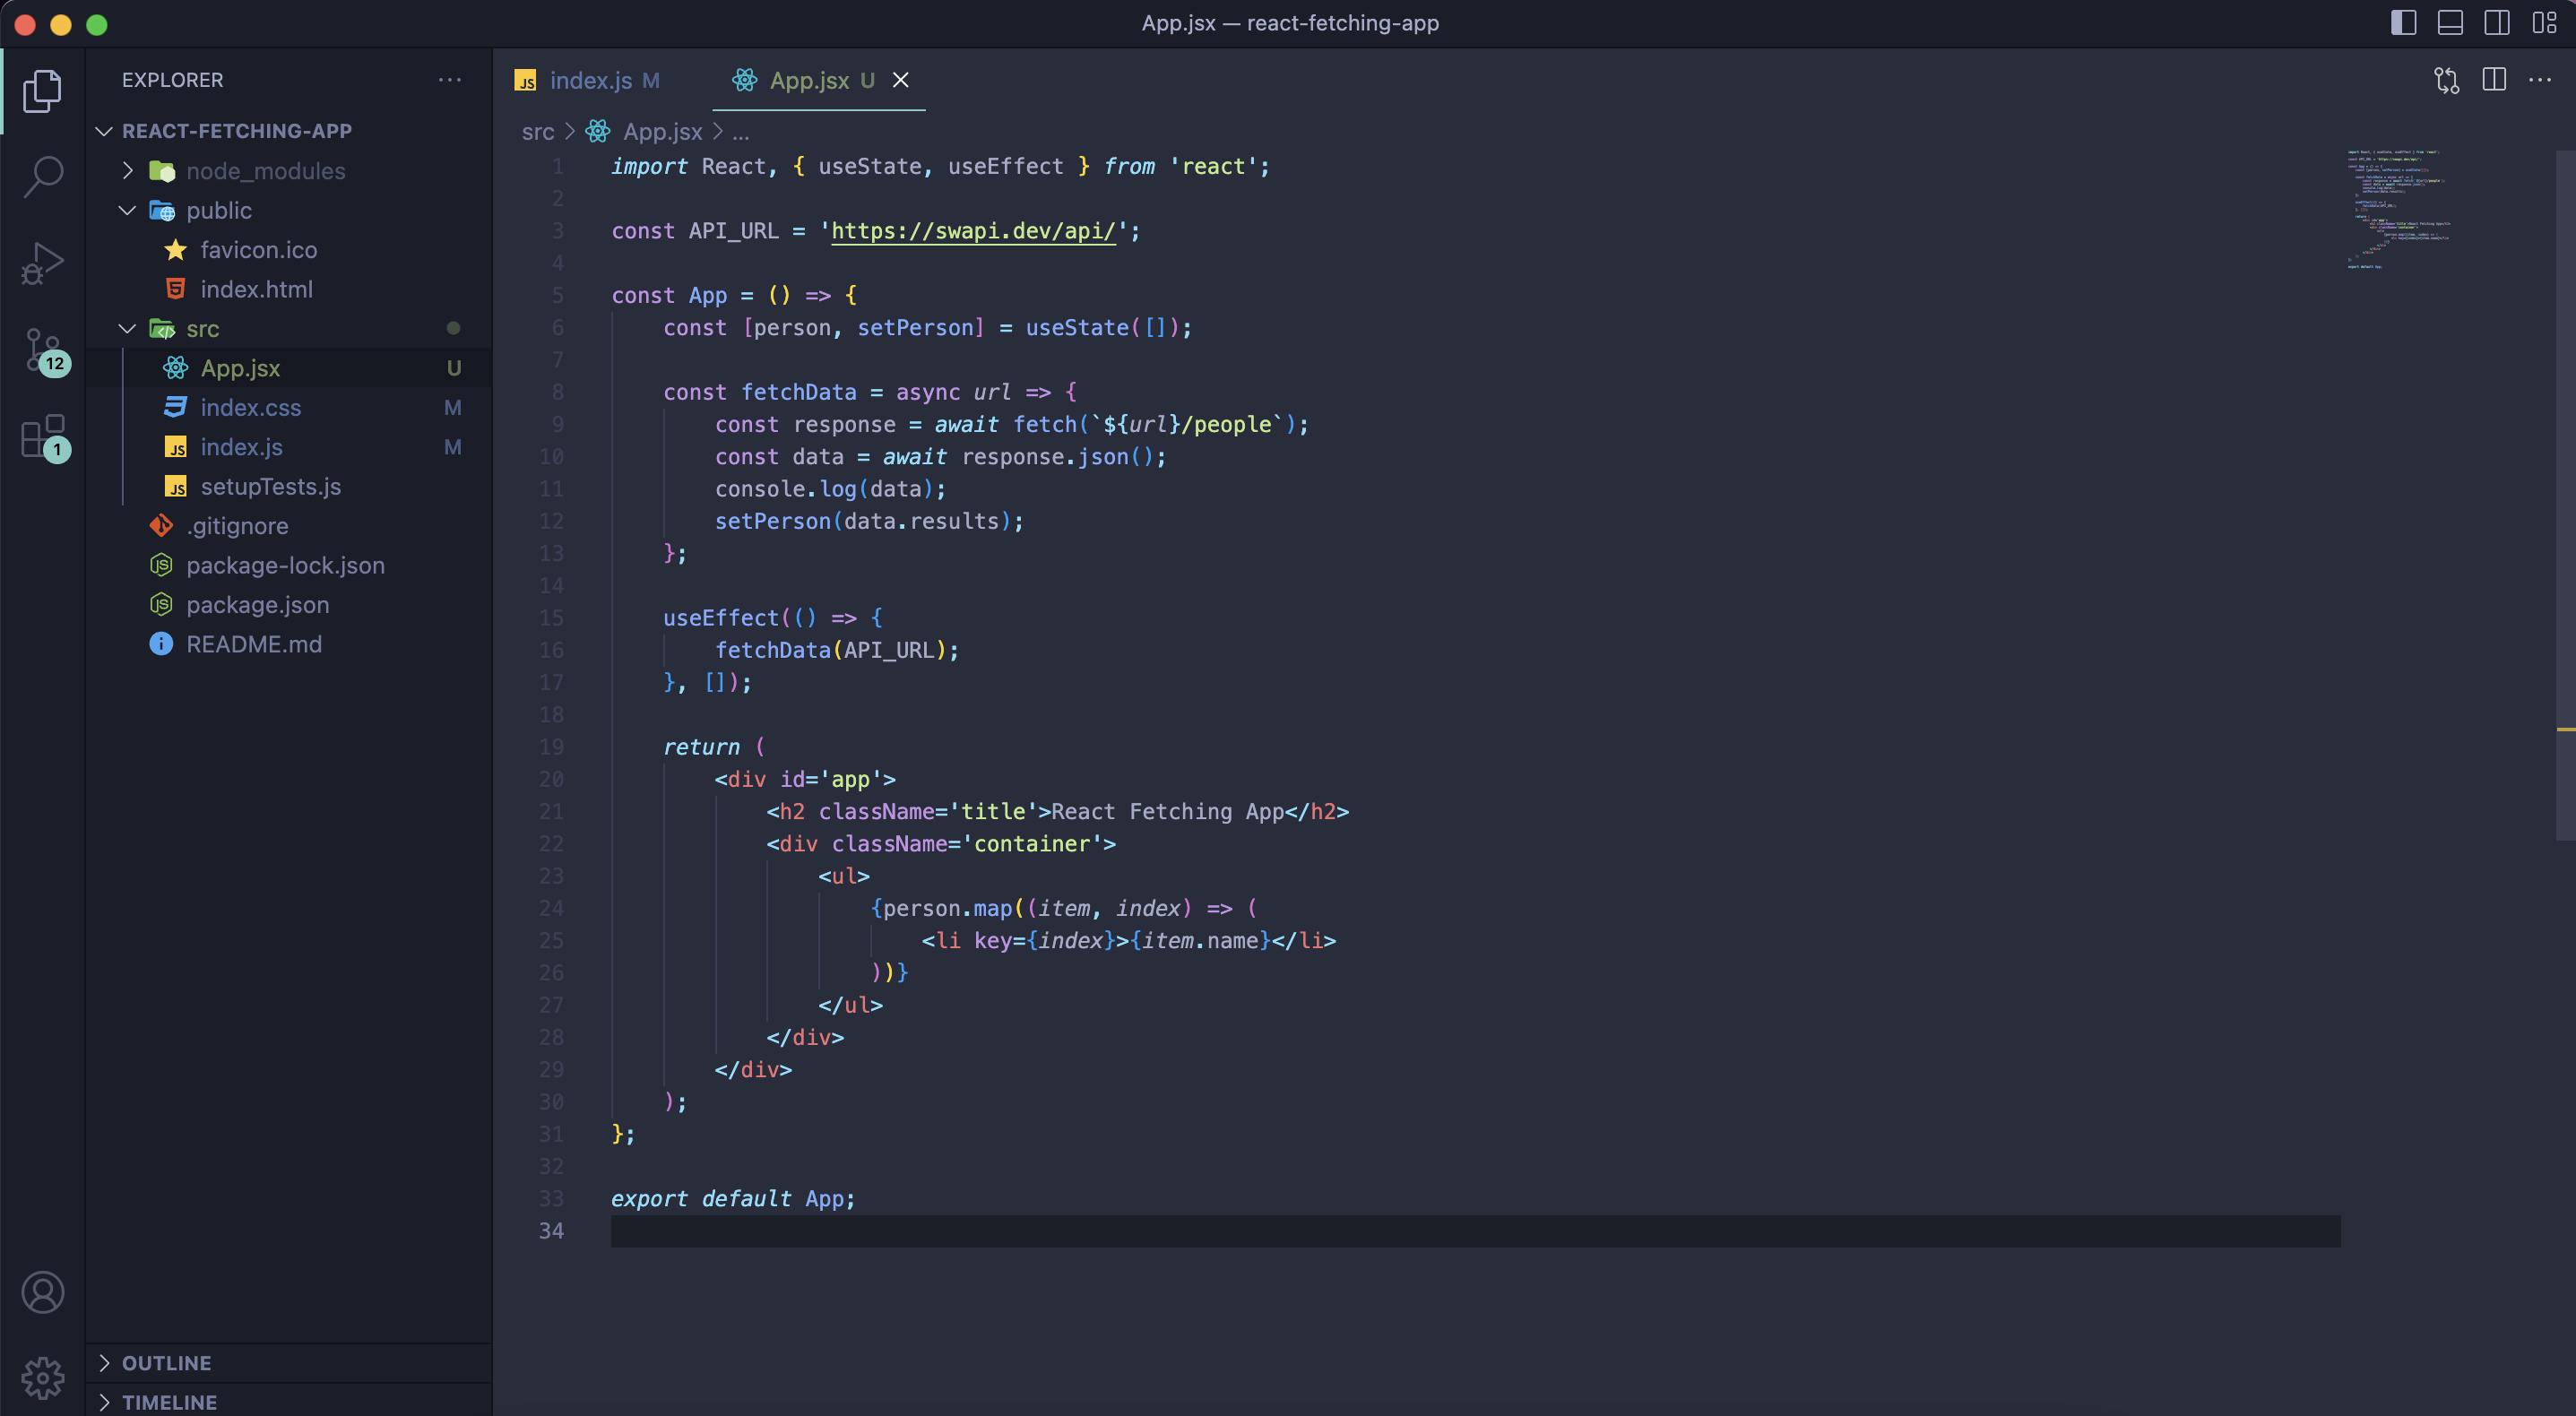
Go ahead and open your browser window for localhost back up and hit refresh (it should already be refreshed after saving the App.jsx file, but doing it for good measure doesn't hurt). You should see a list of all the cool names of people from Star Wars being displayed!
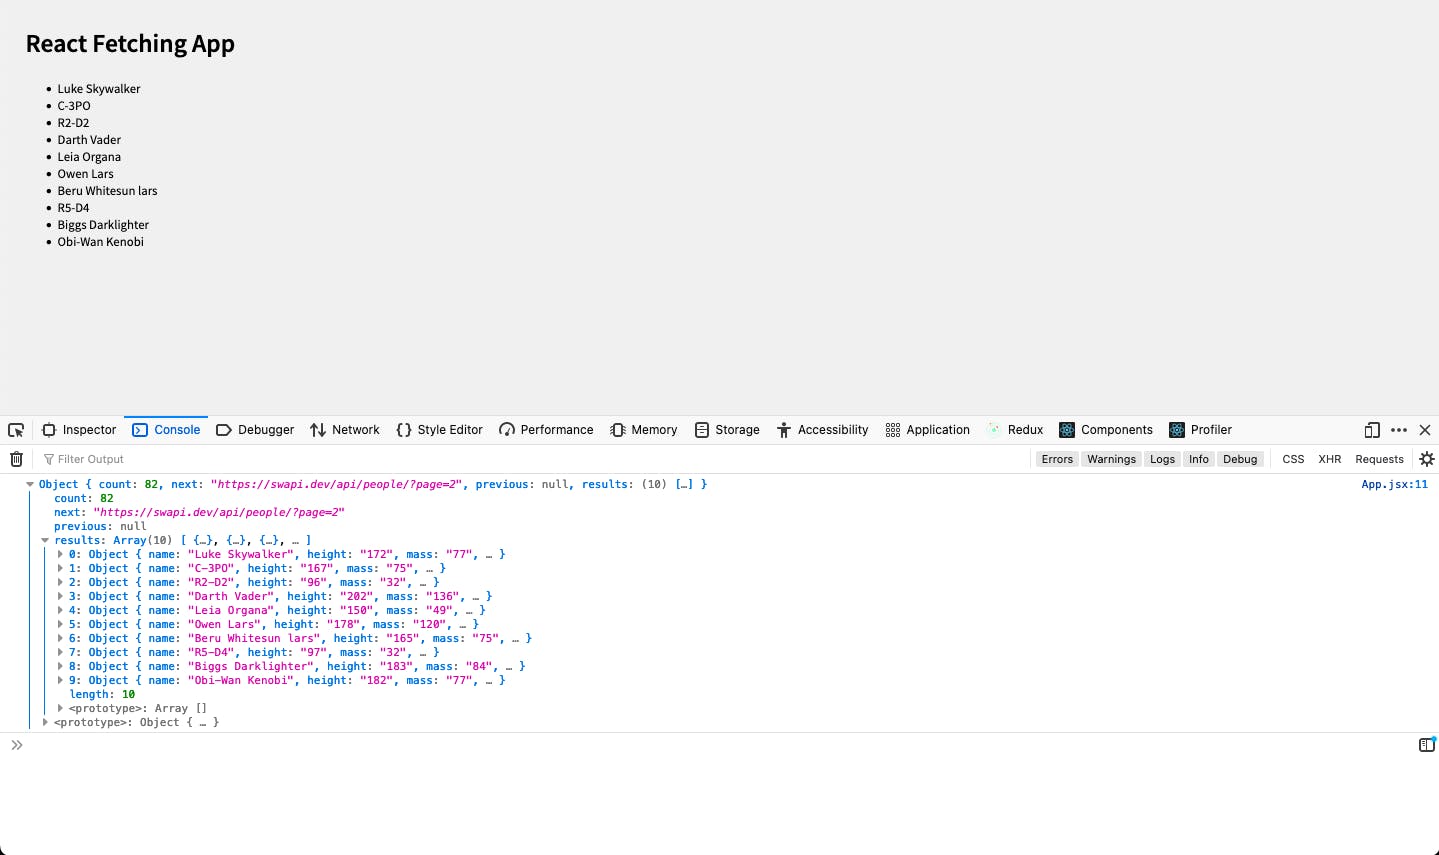
Success! Great job Coder
And that's all there is to it. Fetching data, mapping through the data to find what we need/want to use in our apps, and then producing it for the view. It really is quite simple when you break it down step by step, and it can be a lot of fun when it comes to making your own CRUD apps using large-scale APIs or even making your own data to manipulate and filter through for an app.
Hope you enjoyed it, and I am currently in the process of writing a full breakdown of Data and APIs and what it all means to use them in a full-stack application in both Web and Software.
If you have any questions, feel free to reach out to me. I'll be trying to post about once a week if not once biweekly from here forward, so keep an eye out for the next installment. As always, thanks for taking the time to read my article, and I hope it was educational for your future coding/programming endeavors!

~ Tyler is a Web & Software Engineer with 10+ years in the tech field. Dad, Book nerd, React & TypeScript Advocate.